Computer vision has been at the center of people-oriented systems for a while. The technology allows automating visual data analysis, which among other things, includes self-checkout and inventory management systems at grocery stores.
Two of our engineers — Ruslan Yanchyshyn and Roman Fedoryshyn — took it as a challenge to build an edge computing proof of concept (PoC) to automate produce weighing at a local grocery store. The device runs computer vision algorithms on a Raspberry Pi 3 Model B and an Intel® Movidius™ Neural Compute Stick (NCS).
Here’s how it works:
We’d like to take you through Ruslan’s and Roman's process of building the PoC. It consists of:
- Creating a custom training data set
- Building and training a standard convolutional neural network for image classification with TensorFlow Slim
- Converting the TensorFlow model to a format compatible with Intel NCS to speed up recognition
- Running inference on a Raspberry Pi 3 Model B to receive a video stream from the camera and output product codes to an external LED screen
This article contains practical tips and advice for implementing this PoC, and you’re welcome to follow it as a guide.

Requirements, workflow, and some side notes
Hardware:
- Raspberry Pi 3 Model B
- Raspberry Pi Camera Module V2
- Intel® Movidius™ Neural Compute Stick
- 4-Digit 7-Segment Display Module TM1637
- Mi Power Bank 16000mAh
You don’t have to use the same hardware we did. Any equivalent hardware will do as long as it’s compatible with our approach.
The neural network we built for this PoC recognizes ten fruits and vegetables in video — nine in clear plastic bags (apples, bananas, peaches, carrots, bell peppers, oranges, lemons, limes, and tomatoes) and one without a bag (pineapples). The camera is always fixed in one position and films products at the same angle. Bag placement is arbitrary, but the device can recognize only one bag at a time.
Here’s a high-level overview of the project workflow:

Instead of building a custom TensorFlow model, we decided to use MobileNetV1, a network designed to run on mobile and embedded devices. Although there are newer neural networks with higher accuracy, we stuck with MobileNetV1 as it requires less computational power.
Here are a few MobileNetV1 features to keep in mind:
1. The network has an input size of 224x224x3, but the resolution multiplier (parameter ρ) can lower the resolution to either 192x192, 160x160, or 128x128:

2. Parameter α controls the layer input width. It can be set to 1.0, 0.75, 0.5, or 0.25:
Lowering any of these parameters decreases recognition accuracy. We used the highest values for this PoC to achieve the highest accuracy.
Notes:
1. Our PoC uses high-resolution video and heavy data preprocessing to improve accuracy. This makes recognition slower.
2. Intel NCS has recently been superseded by Intel NCS 2. However, NCS 2 is not backwards compatible with the original Intel NCS, nor are its SDKs.
3. If you want to build this PoC with Intel NCS 2, use the Intel® Distribution of OpenVINO™ toolkit.
Step 1: Preparing a training data set
A data set for training an AI system should thoroughly represent the data the AI will be dealing with. Exactly how much data you need for training depends on what you want to accomplish.
For more on this topic, take a look at our article on collecting and preprocessing data for AI.
Our PoC requires a training data set with at least 10 images for each fruit. Compared to some other training data sets, ours is tiny. Data sets for training real-life systems usually require at least a couple hundred data points for each class (e.g. hundreds of pictures of apples in plastic bags taken at different angles).
Training data must be in the same format as the production data. In our case, we took pictures of apples and other fruit in plastic bags at the same angle and under the same lighting conditions that the PoC would be working with in real life. All images must also have the same resolution and aspect ratio.
After taking images, we grouped them in directories with descriptive titles. Each directory contains about the same number of images.

The last step in preparing training images is to adjust the perspective. We needed to do this because the scale assistant’s camera would be mounted in a specific position, and the training images had to match its field of view:

To adjust image perspective, you can use the OpenCV getPerspectiveTransform and warpPerspective methods. Both of them require four points of interest in a source image.
You can find our complete data preparation script on GitHub.
Step 2: Converting training data to a TensorFlow-compatible format
The prerequisites for this stage are to install TensorFlow and its dependencies, clone the TensorFlow Models library, and place the training images in it.
You can use any TensorFlow/Slim configuration, but consider the following: your version of TensorFlow must be compatible with your Intel NCS SDK. Note that Slim doesn’t support custom training data sets out of the box. We used Slim; to make it work with custom data sets, we needed to make a couple of adjustments. You can find our complete set of files with those adjustments on GitHub.
If your computer supports GPU acceleration, you can use it to speed up the conversion process.
Here’s the TensorFlow/Slim configuration Ruslan used for his PoC. It corresponds with the configuration of the computer he used to train the model:
- CPU: Intel Core i5-8600K
- GPU: GeForce GTX 1080 Ti
- Memory: 32GB
- OS: Ubuntu 18.04.2 LTS
- Kernel: Linux 4.15.0-46-generic
- TensorFlow: 1.9.0 GPU
- NVIDIA driver: 390.116
- CUDA toolkit: 9.0.176
If you’re using your own custom training data set, you might want to adjust the number of validation images. Just assign a different value to the _NUM_VALIDATION variable in the datasets/convert_custom.py file:
# The number of images in the validation set.
# You should change this number for custom dataset according to your own purpose.
_NUM_VALIDATION = 20
We also had to augment some training images to include a wider variety of angles (making bag placement arbitrary as a result):

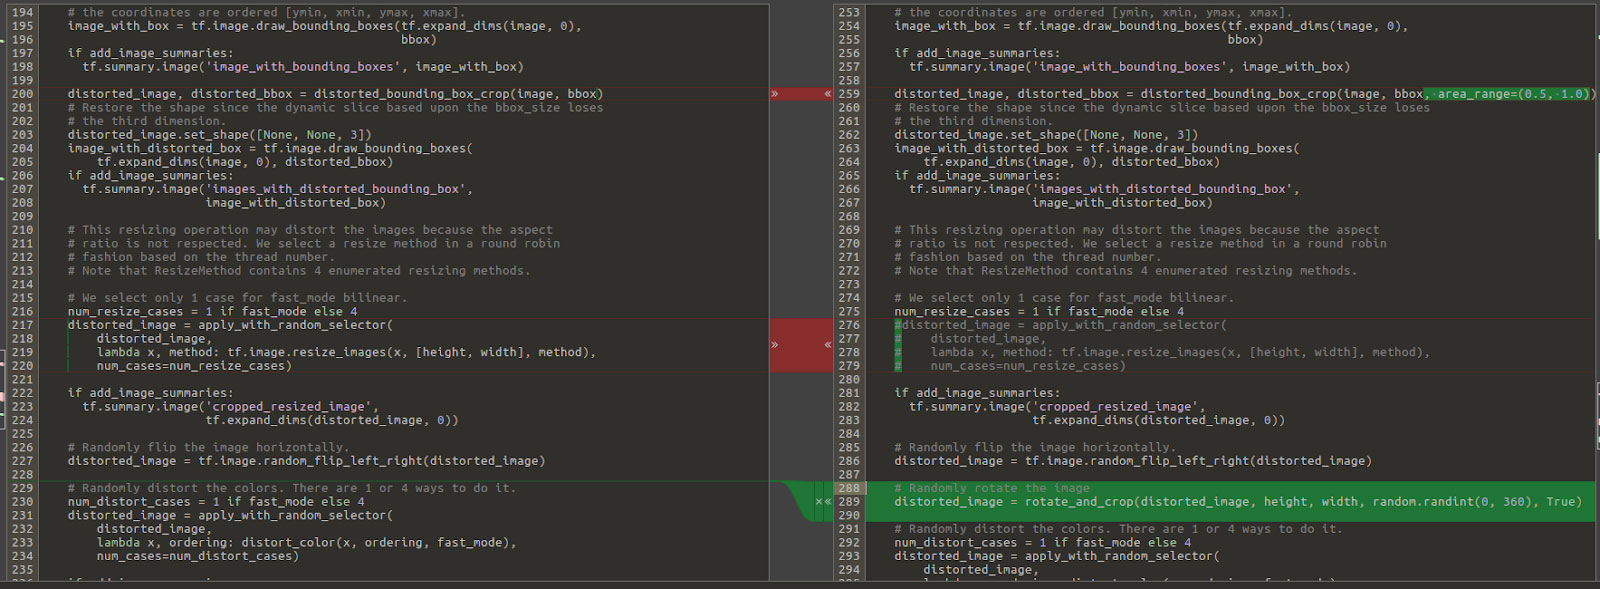
Slim implements similar preprocessing by default. So all we did was adjust Slim’s configuration by adding rotation at a random angle and adjusting move transformation:
Finally, it’s time to launch the conversion. To do that, place the training data set in the models/research/slim/data/input directory and execute the command below:
python download_and_convert_data.py --dataset_name=custom --dataset_dir=data/input

2019-08-21 20:10:34.425292: I tensorflow/core/platform/cpu_feature_guard.cc:141] Your CPU supports instructions that this TensorFlow binary was not compiled to use: AVX2 FMA

2019-08-21 20:10:34.497105: I tensorflow/stream_executor/cuda/cuda_gpu_executor.cc:897] successful NUMA node read from SysFS had negative value (-1), but there must be at least one NUMA node, so returning NUMA node zero

2019-08-21 20:10:34.497485: I tensorflow/core/common_runtime/gpu/gpu_device.cc:1392] Found device 0 with properties:

name: GeForce GTX 1080 Ti major: 6 minor: 1 memoryClockRate(GHz): 1.721

pciBusID: 0000:01:00.0

totalMemory: 10.91GiB freeMemory: 10.72GiB

2019-08-21 20:10:34.497497: I tensorflow/core/common_runtime/gpu/gpu_device.cc:1471] Adding visible gpu devices: 0

2019-08-21 20:10:34.660680: I tensorflow/core/common_runtime/gpu/gpu_device.cc:952] Device interconnect StreamExecutor with strength 1 edge matrix:

2019-08-21 20:10:34.660705: I tensorflow/core/common_runtime/gpu/gpu_device.cc:958]  0

2019-08-21 20:10:34.660709: I tensorflow/core/common_runtime/gpu/gpu_device.cc:971] 0:   N

2019-08-21 20:10:34.660833: I tensorflow/core/common_runtime/gpu/gpu_device.cc:1084] Created TensorFlow device (/job:localhost/replica:0/task:0/device:GPU:0 with 10370 MB memory) -> physical GPU (device: 0, name: GeForce GTX 1080 Ti, pci bus id: 0000:01:00.0, compute capability: 6.1)

>> Converting image 206/206 shard 1

2019-08-21 20:10:35.011918: I tensorflow/core/common_runtime/gpu/gpu_device.cc:1471] Adding visible gpu devices: 0

2019-08-21 20:10:35.011942: I tensorflow/core/common_runtime/gpu/gpu_device.cc:952] Device interconnect StreamExecutor with strength 1 edge matrix:

2019-08-21 20:10:35.011946: I tensorflow/core/common_runtime/gpu/gpu_device.cc:958]  0

2019-08-21 20:10:35.011949: I tensorflow/core/common_runtime/gpu/gpu_device.cc:971] 0:   N

2019-08-21 20:10:35.012028: I tensorflow/core/common_runtime/gpu/gpu_device.cc:1084] Created TensorFlow device (/job:localhost/replica:0/task:0/device:GPU:0 with 10370 MB memory) -> physical GPU (device: 0, name: GeForce GTX 1080 Ti, pci bus id: 0000:01:00.0, compute capability: 6.1)

>> Converting image 20/20 shard 1


Finished converting the custom dataset at directory: data/input
Step 3: Training the TensorFlow model
Instead of training a TensorFlow model from scratch, we used a pretrained model as a base. This is called fine-tuning, and it can reduce training time while increasing recognition accuracy.
Basically, you need to download checkpoint files corresponding to your selected model/variation and specify them in the training command. In our case, we used MobileNet v1, α=1.0, size=224, and thus the checkpoint file we needed was mobilenet_v1_1.0_224.tgz.
Download and extract the file for your model/variation to the models/research/slim/data/pretrained_mobilenet directory.
At this point, you should have already installed TensorFlow, downloaded and adjusted the Models/Slim library, prepared and converted the training data set, and downloaded the pretrained model.
Now execute the following command:
python train_image_classifier.py \

--train_dir=data/train \

--dataset_name=custom \

--dataset_split_name=train \

--dataset_dir=data/input \

--model_name=mobilenet_v1 \

--max_number_of_steps=10000 \

--train_image_size=224 \

--checkpoint_path=data/pretrained_mobilenet/mobilenet_v1_1.0_224.ckpt \

--checkpoint_exclude_scopes=MobilenetV1/Logits \

--save_summaries_secs=30
You might want to adjust the max_number_of_steps. This controls how many times to perform training on a single piece of data. (Before doing so, check out this discussion on whether you should.) Another parameter you can adjust is the train_image_size, but do keep it in sync with the other parameters.
To stop training, hit Ctrl+C.
To reset training, delete the files in the data/train directory.
If your computer’s configuration is similar to ours, training should take about 4 to 5 minutes. Here’s the output you should see in the end:
WARNING:tensorflow:From train_image_classifier.py:413: create_global_step (from tensorflow.contrib.framework.python.ops.variables) is deprecated and will be removed in a future version.

Instructions for updating:

Please switch to tf.train.create_global_step

WARNING:tensorflow:From train_image_classifier.py:481: softmax_cross_entropy (from tensorflow.contrib.losses.python.losses.loss_ops) is deprecated and will be removed after 2016-12-30.

Instructions for updating:

Use tf.losses.softmax_cross_entropy instead. Note that the order of the logits and labels arguments has been changed.

WARNING:tensorflow:From /home/administrator/venv/local/lib/python2.7/site-packages/tensorflow/contrib/losses/python/losses/loss_ops.py:398: softmax_cross_entropy_with_logits (from tensorflow.python.ops.nn_ops) is deprecated and will be removed in a future version.

Instructions for updating:


Future major versions of TensorFlow will allow gradients to flow

into the labels input on backprop by default.


See @{tf.nn.softmax_cross_entropy_with_logits_v2}.


WARNING:tensorflow:From /home/administrator/venv/local/lib/python2.7/site-packages/tensorflow/contrib/losses/python/losses/loss_ops.py:399: compute_weighted_loss (from tensorflow.contrib.losses.python.losses.loss_ops) is deprecated and will be removed after 2016-12-30.

Instructions for updating:

Use tf.losses.compute_weighted_loss instead.

WARNING:tensorflow:From /home/administrator/venv/local/lib/python2.7/site-packages/tensorflow/contrib/losses/python/losses/loss_ops.py:147: add_loss (from tensorflow.contrib.losses.python.losses.loss_ops) is deprecated and will be removed after 2016-12-30.

Instructions for updating:

Use tf.losses.add_loss instead.

INFO:tensorflow:Fine-tuning from data/pretrained_mobilenet/mobilenet_v1_1.0_224.ckpt

WARNING:tensorflow:From /home/administrator/venv/local/lib/python2.7/site-packages/tensorflow/contrib/slim/python/slim/learning.py:737: __init__ (from tensorflow.python.training.supervisor) is deprecated and will be removed in a future version.

Instructions for updating:

Please switch to tf.train.MonitoredTrainingSession

2019-08-21 20:21:29.274214: I tensorflow/core/platform/cpu_feature_guard.cc:141] Your CPU supports instructions that this TensorFlow binary was not compiled to use: AVX2 FMA

2019-08-21 20:21:29.354994: I tensorflow/stream_executor/cuda/cuda_gpu_executor.cc:897] successful NUMA node read from SysFS had negative value (-1), but there must be at least one NUMA node, so returning NUMA node zero

2019-08-21 20:21:29.355315: I tensorflow/core/common_runtime/gpu/gpu_device.cc:1392] Found device 0 with properties:

name: GeForce GTX 1080 Ti major: 6 minor: 1 memoryClockRate(GHz): 1.721

pciBusID: 0000:01:00.0

totalMemory: 10.91GiB freeMemory: 10.72GiB

2019-08-21 20:21:29.355326: I tensorflow/core/common_runtime/gpu/gpu_device.cc:1471] Adding visible gpu devices: 0

2019-08-21 20:21:29.508733: I tensorflow/core/common_runtime/gpu/gpu_device.cc:952] Device interconnect StreamExecutor with strength 1 edge matrix:

2019-08-21 20:21:29.508758: I tensorflow/core/common_runtime/gpu/gpu_device.cc:958]  0

2019-08-21 20:21:29.508763: I tensorflow/core/common_runtime/gpu/gpu_device.cc:971] 0:   N

2019-08-21 20:21:29.508889: I tensorflow/core/common_runtime/gpu/gpu_device.cc:1084] Created TensorFlow device (/job:localhost/replica:0/task:0/device:GPU:0 with 10370 MB memory) -> physical GPU (device: 0, name: GeForce GTX 1080 Ti, pci bus id: 0000:01:00.0, compute capability: 6.1)

INFO:tensorflow:Restoring parameters from data/pretrained_mobilenet/mobilenet_v1_1.0_224.ckpt

INFO:tensorflow:Running local_init_op.

INFO:tensorflow:Done running local_init_op.

INFO:tensorflow:Starting Session.

INFO:tensorflow:Saving checkpoint to path data/train/model.ckpt

INFO:tensorflow:Starting Queues.

INFO:tensorflow:global_step/sec: 0

INFO:tensorflow:Recording summary at step 1.

INFO:tensorflow:global step 10: loss = 0.7872 (0.246 sec/step)

INFO:tensorflow:global step 20: loss = 0.9961 (0.223 sec/step)

INFO:tensorflow:global step 30: loss = 0.3810 (0.304 sec/step)

INFO:tensorflow:global step 40: loss = 0.4539 (0.312 sec/step)But what’s more important is that you should find the following files in your models/research/slim/data/train directory:
- checkpoint
- events.out.tfevents.1566409062.prometeus
- events.out.tfevents.1566465444.prometeus
- graph.pbtxt
- model.ckpt-10000.data-00000-of-00001
- model.ckpt-10000.index
- model.ckpt-10000.meta
- model.ckpt-2164.data-00000-of-00001
- model.ckpt-2164.index
- model.ckpt-2164.meta
- model.ckpt-4319.data-00000-of-00001
- model.ckpt-4319.index
- model.ckpt-4319.meta
- model.ckpt-6474.data-00000-of-00001
- model.ckpt-6474.index
- model.ckpt-6474.meta
- model.ckpt-8647.data-00000-of-00001
- model.ckpt-8647.index
- model.ckpt-8647.meta
You might also want to run training evaluation:
python eval_image_classifier.py \

    --alsologtostderr \

    --checkpoint_path=data/train/model.ckpt-10000 \

    --dataset_dir=data/input \

    --dataset_name=custom \

    --dataset_split_name=validation \

    --model_name=mobilenet_v1
Here’s the output (we’ve skipped the TensorFlow header):
INFO:tensorflow:Restoring parameters from data/train/model.ckpt-10000

INFO:tensorflow:Running local_init_op.

INFO:tensorflow:Done running local_init_op.

INFO:tensorflow:Evaluation [1/1]

eval/Recall_5[1]

eval/Accuracy[0.85]

INFO:tensorflow:Finished evaluation at 2019-08-29-17:07:01
Finally, you might want to run TensorBoard:
tensorboard --logdir=data/trainStep 4: Converting the TensorFlow model to an Intel NCS-compatible format
TensorFlow models are not compatible with Intel NCS by default. But making them compatible is not that difficult. All it takes is three steps:
1. Export the graph
Start by converting the graph and model data to a single exportable file:
python export_inference_graph.py \

  --alsologtostderr \

  --model_name=mobilenet_v1 \

  --dataset_name=custom \

  --image_size=224 \

  --output_file=data/out/export.pb
The command output is unclear:
INFO:tensorflow:Scale of 0 disables regularizer.But the actual result is this file: models/research/slim/data/out/export.pb.
2. Freeze the graph
Next, freeze the graph to remove variables only necessary for training and to optimize the model:
python ~/tensorflow/tensorflow/python/tools/freeze_graph.py \

  --input_graph=data/out/export.pb \

  --input_checkpoint=data/train/model.ckpt-10000 \

  --input_binary=true \

  --output_graph=data/out/frozen.pb \

  --output_node_names=MobilenetV1/Predictions/Reshape_1
The execution output is again unclear (it’s just the standard TensorFlow header). The actual result is the models/research/slim/data/out/frozen.pb file.
3. Convert the TensorFlow model to Intel NCS format
To convert your frozen graph to the Intel NCS format, run this command:
mvNCCompile -s 12 data/out/frozen.pb -in=input -on=MobilenetV1/Predictions/Reshape_1 -o data/out/movidius_graph.binThe command output is a bit verbose. The last lines are:
/usr/local/bin/ncsdk/Controllers/FileIO.py:52: UserWarning: You are using a large type. Consider reducing your data sizes for best performance

  "Consider reducing your data sizes for best performance\033[0m")
And, as expected, the actual result is this file: models/research/slim/data/out/movidius_graph.bin.
Step 5: Running inference on a Raspberry Pi 3 Model B
Inference entails running a neural network for the initial goal of its development. In our case, this means running the neural network for image recognition.
To run inference on our hardware, we need to install and configure the Camera Module V2 drivers and Intel® Movidius™ NCSDK.
.svg)
Initially, the device captures an image with the camera, corrects its perspective, and crops it. Then it passes the image along with the model to the Intel NCS and runs inference. Finally, the Intel NCS analyzes the inference results and outputs them to an LED screen.
The script for running inference is rather straightforward.
The only thing we’d like to focus on is connecting the LED display to the Raspberry Pi. Our PoC uses a 4-digit 7-segment LED display with a built-in TM1637 controller:

Without the TM1637 controller, Raspberry Pi 3 would need to constantly refresh each digit value in code. To work with this screen, you can use the adjusted actor-led-7segment-4numbers Python module. Here’s the wiring:

If you’ve been following this article as a guide, the software and hardware development parts are officially over. By now, you should already have built and trained a neural network that can recognize fruits and vegetables and output data accordingly.
But since our PoC has to be in a fixed position, we built a custom stand for it. The process took some trial and error, and we’d like to share the results with you.
Optional step: Making a stand for the PoC
The stand’s main purpose is to mount the PoC hardware near the scale. The stand has to be compact and offer a clear view of the scale plate to the camera.
Our initial idea was to place part of the hardware, i.e. the camera and display, directly above the scale, and to install all the rest behind it.

This design didn’t work, however, because the device would be installed near a scale with a button board for selecting product numbers, and customers need access to this board. So we modified the stand design to avoid getting in the customer’s way.

We decided to place the PoC on a vertical support next to the scale: the camera and the display module are at the top, and the rest of the hardware is at the bottom.

After defining the concept behind the stand, we chose materials and components appropriate to mount the PoC. They included rectangular aluminium pipe, mounting brackets and elements, plastic, and some other materials.

We decided to hide the CSI ribbon cable from the Raspberry Pi camera and the wires from the LED display in a rectangular aluminium pipe. An opening in the plastic case of the holder makes it possible to power the Raspberry Pi either from a power bank or from some other source. The whole construction ended up being pretty compact and easy to install.
Summary
Computer vision and IoT development services have a variety of applications in retail. We took it as a challenge to build an edge computing PoC for retail using a Raspberry Pi 3 Model B and an Intel Movidius Neural Compute Stick.
To build this device, we:
- Built a training data set for image classification
- Converted that training data set to a format compatible with TensorFlow
- Trained a TensorFlow model
- Converted the TensorFlow model to a format compatible with Intel NCS
- Ran inference on a Raspberry Pi 3
- Built a custom stand to mount the hardware
We’d be glad if you took our idea and made it into your own ambitious project. Do share your results!
Let’s talk about your next PoC or prototype
If you have any questions about our PoC or want to discuss some ideas of your own, write a quick message to Slavic Voitovych. He’s always here to discuss the latest trends in IoT and help you find the services you need at Lemberg.