

AI has become indispensable for solving complex problems, and though AI can extract insights from large amounts of data, it is no magic. In this article, we explore the advantages and limitations of embedded AI systems and demonstrate a step-by-step tutorial on deploying a pre-trained model for keyword recognition from human speech.
How to use AI in embedded systems?
Recently, the practice of performing computation on embedded devices has gained popularity. It is referred to as edge AI, offering numerous advantages:
- reduced network bandwidth use;
- increased security;
- minimized latency;
- ability to operate in areas without internet connectivity.
Edge AI also has some disadvantages. First, embedded devices have limited resources, meaning you can’t deploy very complex ML models. Second, it’s challenging to centralize data collection across the entire system, which complicates model retraining.
Some smart home assistants use a hybrid approach. Lightweight ML models are deployed locally on the device that continuously listens for a wake word — such as “Alexa,” “Hey Siri,” or “Hello Google.” Once the wake word is detected, the audio is sent to external servers, where it’s analyzed using speech-to-text neural networks. Next, the system generates a response and returns an audio reply.
Running AI algorithms directly on embedded devices allows advanced capabilities, including:
- detecting abnormalities in equipment behavior and predicting maintenance needs;
- identifying images, speech keywords, or gestures and triggering specific actions;
- analyzing collected data and learn patterns to suggest further actions;
- adjusting the system according to real-time changes in the environment.
However, to make edge AI work effectively, several steps must be taken to implement it properly.
How to get started with AI on an embedded system?
The stages of creating neural networks are the same for cloud and edge computing. They include data collection, feature extraction, model training, model validation, and model deployment.
For AI embedded systems, there are a few extra steps to consider. After validation, the model should be compressed to meet the embedded system requirements. This is achieved using tools like LiteRT (formerly Tensorflow Lite), which produces a smaller .tflite format model. It’s also important to test the model after deploying it to the microcontroller to ensure it performs just as during desktop testing.
Our embedded AI development services cover the full workflow for creating neural networks on embedded systems, including:

- Collecting data from sensors. Use the same sensor for training and inference, another word for applying an ML model to unseen data.
- Extracting features. When signals are involved, it means applying digital signal processing, such as de-noising and performing a Fourier transform.
- Model training. Should be performed on a desktop because this task requires significant resources. Frameworks such as Tensorflow, Keras, or PyTorch are typically used for this purpose. Python can be used to configure various hyperparameters of the neural network.
- Validation. Before training the model, a portion of the dataset, typically 10-20%, is dedicated to model validation. This data is not used during the training process; instead, it is used to predict labels or outputs. A confusion matrix is a popular tool for this evaluation. If you are not satisfied with the performance of the trained model, you can adjust the hyperparameters to improve it.
- Model deployment. Since the model is essentially binary data, it can be loaded onto the microcontroller and the firmware. Employ a framework that makes an inference based on input data and the model itself. The TensorFlow framework provides several options, including a generic C++ library and specific libraries for platforms like Arduino and ESP32 (however, not all platforms and hardware are supported). Additionally, most of these libraries are designed for C++, so a C++ compiler is necessary.
- Testing whether the model replicates its desktop performance. Over time, additional data can be collected while the model is deployed to refine and retrain it.

How to implement AI in embedded systems: Speech keyword recognition example
Let’s consider a practical example of embedded artificial intelligence by deploying a pre-trained model for keyword recognition in human speech, similar to what smart assistants do. We will use a model trained with TensorFlow and optimized by LiteRT in the form of Flat Buffer and STM32 microcontroller as a target device. We will structure our speech recognition demo using a micro speech example from TensorFlow Lite. If you want to train your model by adding custom keywords, use these resources: TensorFlow Simple Audio.
Step 1: Getting TF library
To run a model on a microcontroller, you must have a TensorFlow library. To get it, install WSL. The library can only be built on Linux or Mac; if you use Windows, use WSL. Open WSL and create a folder for your files and go to this folder:
mkdir edge_ai
cd edge_ai/
Clone TF Lite Micro repository:
git clone https://github.com/tensorflow/tflite-micro
Step 2: Building a static library
Download the packages needed for building a library and generating a project:
sudo apt-get update
sudo apt-get install python3-venv
Create a Python virtual environment for the Python packages required to build the library:
python3 -m venv venv
Activate environment:
source venv/bin/activate
Install needed Python packages:
pip install numpy Pillow
Go to the cloned repository:
cd tflite-micro/
Use the ‘make’ command to build the microlite library. In this process, specify the necessary parameters: TARGET=cortex_m_generic to TARGET_ARCH=cortex-m4 since you will use this library on STM32F4 microcontroller, which has a Cortex M4 processor. This command will take longer to complete.
make -f tensorflow/lite/micro/tools/make/Makefile TARGET=cortex_m_generic TARGET_ARCH=cortex-m4 microlite
The library now can be found at:
<tflite repo location>/tflite-micro/gen/cortex_m_generic_cortex-m4_default_gcc/lib/libtensorflow-microlite.a
You will need it later for importing into your project.
Step 3: Generate TensorFlow project structure with required headers
You need header files that contain functions prototypes for operating on the ML model, with the implementations included in the static library you built. Use the TFLM project generation script to create a directory tree containing the sources necessary to build the TFLM library:
python3 tensorflow/lite/micro/tools/project_generation/create_tflm_tree.py --makefile_options="TARGET=cortex_m_generic TARGET_ARCH=cortex-m4" -e micro_speech ../tflm
Specify makefile options to match your target architecture. Also, add the -e option to include the micro_speech example code. Your code will be based on that, and you will use the model and test audio data there in the form of generated C arrays.
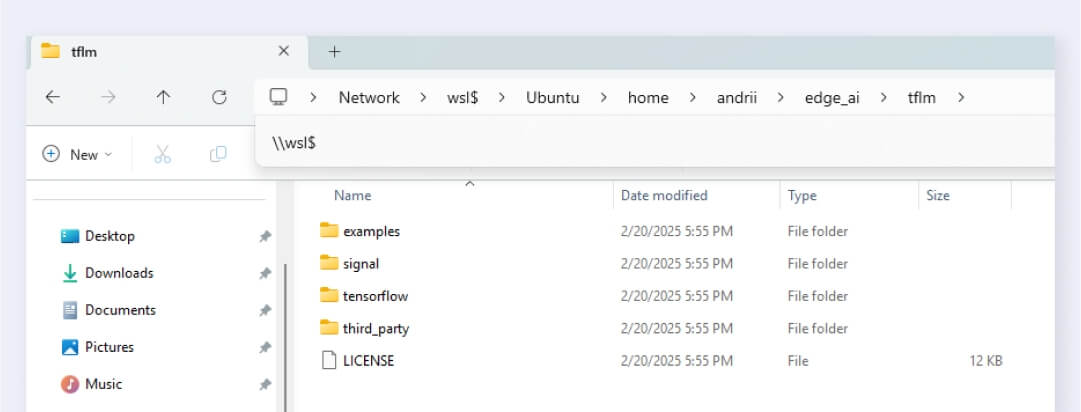
The last parameter that you specified indicates the output location of the generated file tree. Now, you can view the generated file tree by entering "\\wsl$" in the File Explorer address bar and see these files at Ubuntu/home/<your username>/edge_ai/tflm.
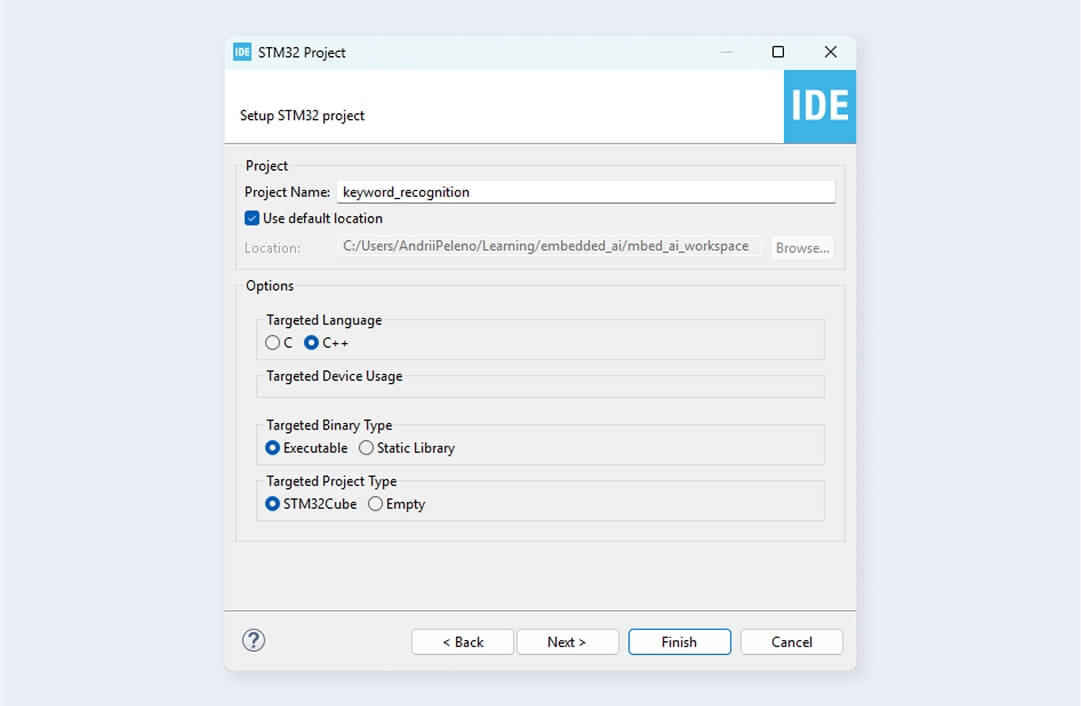
Step 4: Creating the STM32CubeIDE project
Open STM32CubeIDE to create a new STM32 project. Name it and select a location. Also, choose C++ as the Targeted Language since a C++ compiler is needed for using the TensorFlow library.
Initialize USART2 peripheral for debugging logs and rename main.c file to main.cpp. Be aware that generating new code with the STM32CubeMX generator will create a new main.c file and include all peripheral initialization there. Therefore, ensure all initializations are complete before renaming this file.
Step 5: Adding the library, header files, and model to our project
Go to the cloned tflite-micro repository in your WSL filesystem and get the generated library there:
/tflite-micro/gen/cortex_m_generic_cortex-m4_default_gcc/lib/libtensorflow-microlite.a
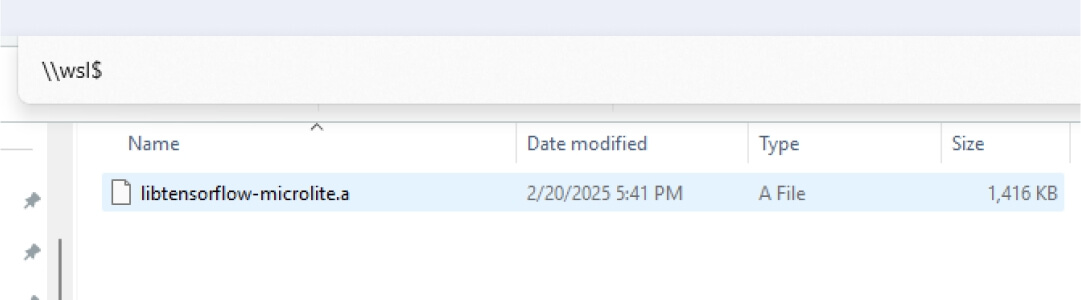
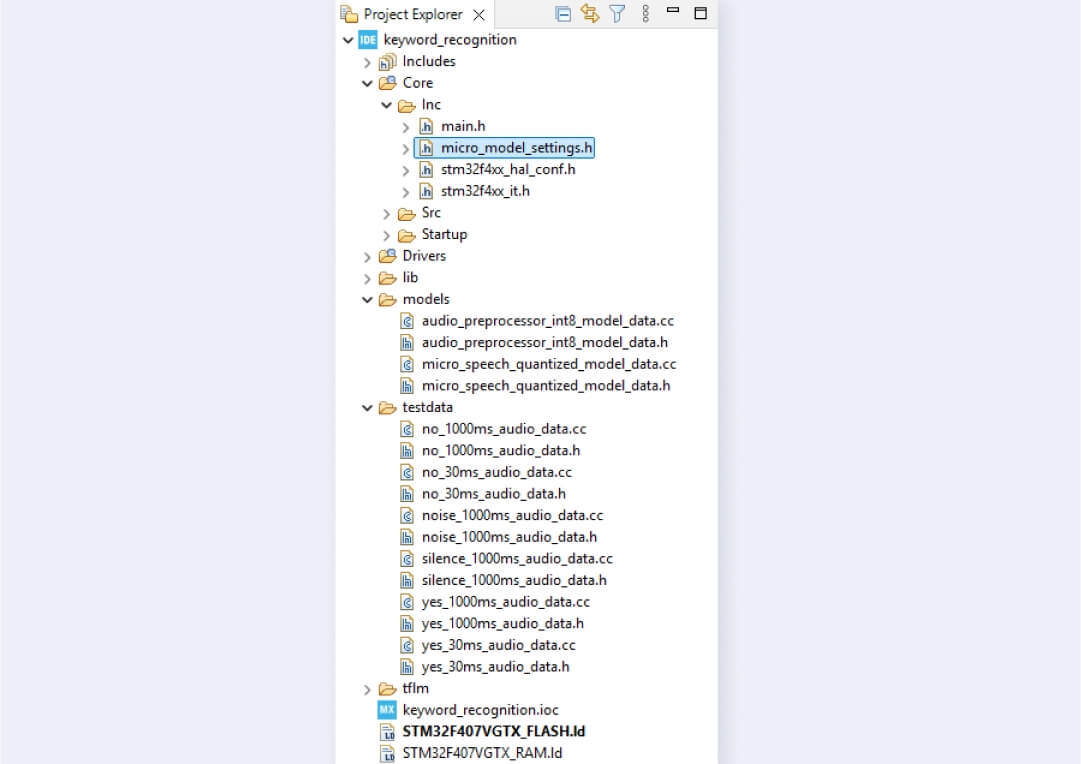
Create a lib folder in your STM32 project and copy the library file there. Copy the generated tflm tree to your project, excluding the examples folder. From tflm/examples/micro_speech, copy:
- models/ and testdata/ folders to the root of your project;
- micro_model_settings.h file to the Core/Inc folder.
Models/ folder contains .tflite models in the form of a C array used for inference. Testdata/ folder contains audio files converted to C arrays, allowing you to make inferences without a microphone.
Include paths to added files.

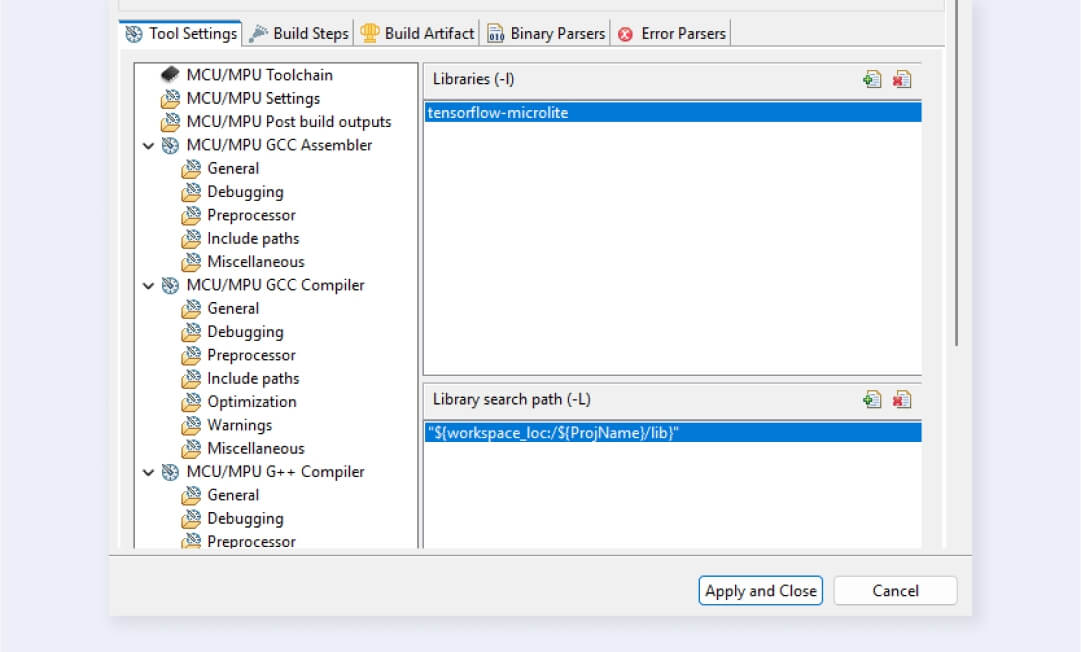
Specify the library path and the library itself in C/C++ Build > Settings > Tool Settings > MCU/MPU G++ Linker. Note that you don’t need to write the lib prefix and .a file extension for the library name.
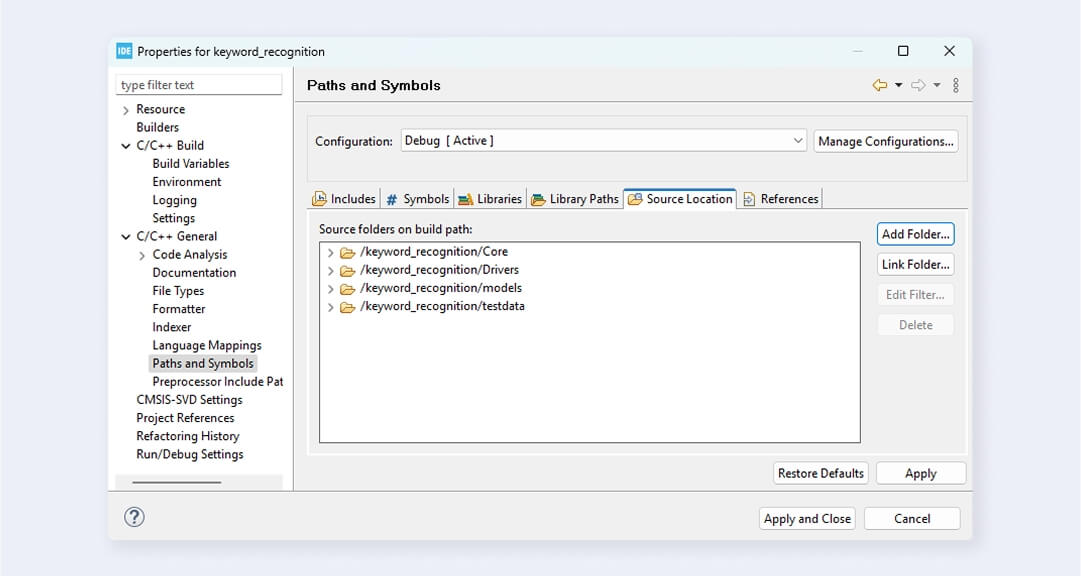
Add source models/ and testdata/ folders to the source location (C/C++ General > Paths and Symbols > Source Location). You don’t need to specify the tflm/ folder because it’s only used for headers. Source files shouldn’t be compiled, as you already have the implementations in the compiled library.
Since you compiled the TensorFlow library without a Floating Point Unit (FPU), you must turn it off in the project. Go to C/C++ Build > Settings > Tool Settings > MCU/MPU Settings and select None in the Floating-point unit field and Software implementation in the Floating-point ABI field. If you want to use FPU, compile TensorFlow-micro library using this flag:
make -f tensorflow/lite/micro/tools/make/Makefile TARGET=cortex_m_generic TARGET_ARCH=cortex-m4+fp microlite
Also, tick the checkbox Use float with printf from newlib-nano to add support of floating point values for printf (and variants) in STM32.

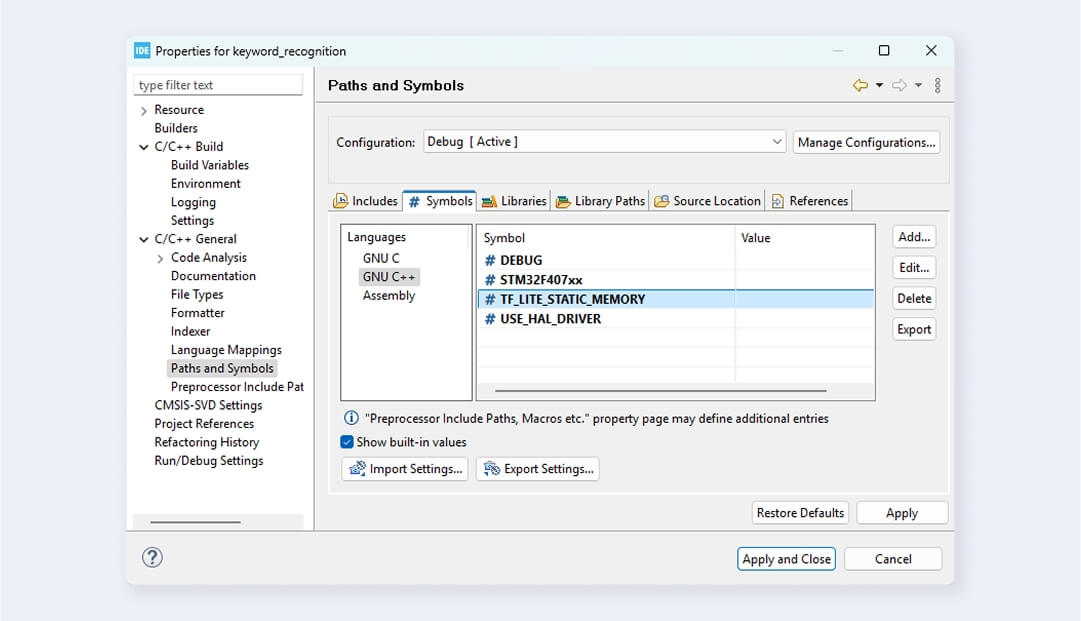
Add TF_LITE_STATIC_MEMORY define to eliminate dynamic memory allocation for TFLM.
How to write the main program?
1. Include all required headers to work with TensorFlow
This code handles the dependencies and model data for keyword recognition on an STM32 microcontroller using TensorFlow Lite for Microcontrollers (TFLM).
It includes the core header of TensorFlow Lite for setting up the interpreter and logging, along with a Cortex-M-specific debug logging utility. Two pre-trained, quantized neural network models are loaded: one for audio preprocessing (audio_preprocessor_int8_model_data.h) and another for keyword recognition (micro_speech_quantized_model_data.h).
Additionally, the code imports predefined test audio samples such as “yes,” “no,” “silence,” and “noise,” used for validation and benchmarking of inference. These datasets verify the model’s accuracy.
2. Define debug callback
The callback provides a debugging mechanism by redirecting log messages to UART. It transmits the given string s over UART2 using the HAL. This function is called by the TensorFlow library when the MicroPrintf function is executed. The callback must be registered with the RegisterDebugLogCallback function.
3. Load the model
The tflite::GetModel() function retrieves a pointer to the model structure from the quantized model data (g_micro_speech_quantized_model_data). This ensures that the model is loaded into memory and is ready for inference. The TFLITE_CHECK_EQ(model->version(), TFLITE_SCHEMA_VERSION; statement ensures that the model’s schema version is compatible with the expected version of the TensorFlow Lite interpreter. If there is a mismatch, the program stops execution.
4. Define operation resolvers
Two instances of MicroMutableOpResolver are created, with a maximum predefined number of operators: four for MicroSpeech and 18 for AudioPreprocessor. These resolvers enable the TFLite interpreter to identify and execute the necessary operations.
RegisterOps(MicroSpeechOpResolver &op_resolver): Registers core neural network operations used in the keyword recognition model.
RegisterOps(AudioPreprocessorOpResolver &op_resolver): Registers a broader set of operations required for transforming raw audio data into a format suitable for neural network inference.
The RegisterOps function is responsible for registering operations with the resolver.
5. Create an interpreter
You instantiate a tflite::MicroInterpreter object that efficiently manages memory using a preallocated arena, which avoids dynamic memory allocation (malloc/new).
6. Allocate the model’s tensors
Allocate memory for the model’s tensors, which include the input, output, and intermediate tensors. Log the number of bytes used from the memory arena by the interpreter, which provides information about the memory consumption of the model during inference. This practice helps optimize memory usage.
7. Define and verify the input and output tensors
This code section retrieves the model's input and output tensors and performs validation checks to ensure compatibility with the feature data and prediction categories.
8. Extract features
Next, extract features from the raw audio using a TensorFlow model. Then, run inference using the extracted features as input. To learn more about how feature extraction is performed, see the TensorFlow Lite example.
Copy the extracted features to the input tensor and perform the inference. This code invokes the inference process of the model, executing the TensorFlow Lite model with the input data transferred to the input tensor.
9. Dequantize the output value and compare it with the expected output
Since your model produces int8 output, convert the model back to float using the output scale and output zero point. You also log the predictions and corresponding labels, comparing the predicted category to the expected label.
10. Test inference on the audio sample
These test cases are used to evaluate the performance of the keyword recognition system with different audio samples. The results of these tests will show how effectively the system can recognize the target keywords while filtering out noise and silence.
11. Evaluate results
Verify correct model predictions by connecting the UART pins to a USB-UART converter, opening a Serial Terminal, and flashing your code onto the STM32 microcontroller.
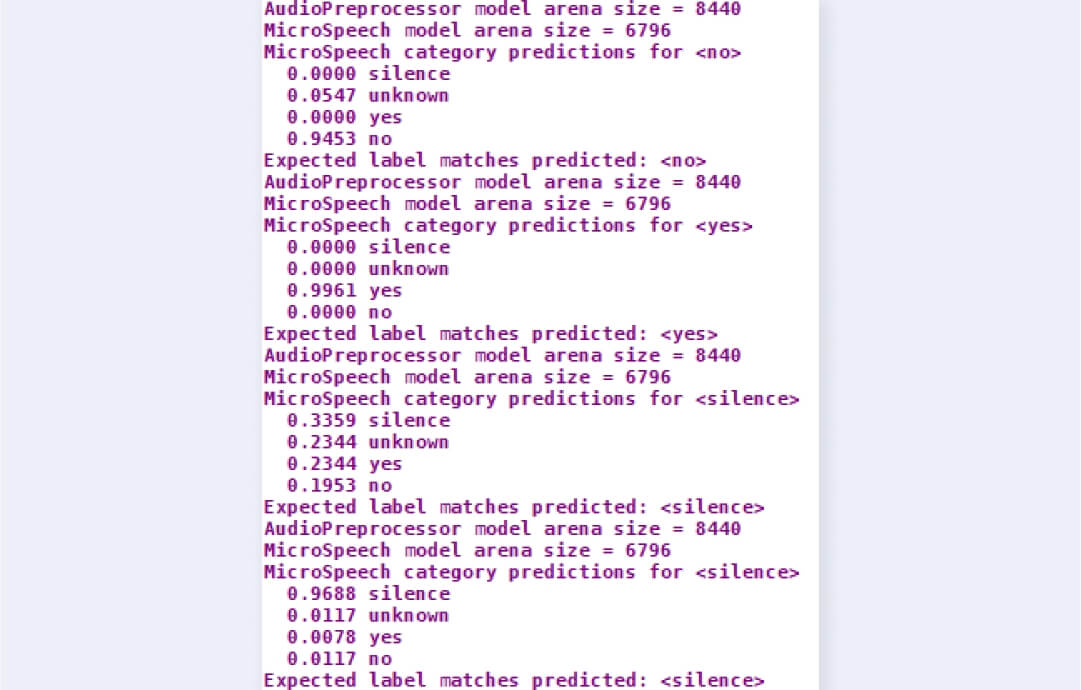
The results show the inference performance of the TensorFlow Lite model for different audio samples. The model processes each sample and generates features using an AudioPreprocessor, then performs classification using the MicroSpeech model. The model predicts probabilities for four categories: silence, unknown, yes, and no. The highest probability among these categories determines the predicted label.
| Test sample | Results |
| “No” sample | Correctly classified the sample as “no” with high confidence (0.9453, the highest probability among all other categories). |
| “Yes” sample | Correctly classified the sample as “yes” with very high confidence (0.9961, the highest probability among all other categories). |
| “Silence” sample | Classified the sample as “silence” but with lower confidence (0.3359). The probabilities for “unknown” and “yes” are relatively high, indicating some uncertainty in distinguishing silence from background noise. |
| “Silence” (with noise) sample | Correctly classified this sample as “silence,” with very high confidence (0.9688, the highest probability among all other categories). The model effectively distinguishes noise from speech. |
The model accurately recognizes “yes” and “no” samples. Still, its silence classification indicates the need for improvement. The binary size of the deployed model is under 30 KB, making it well-suited for resource-constrained embedded systems. For projects like this, our embedded development services provide end-to-end support, from optimizing firmware to deploying reliable AI solutions on your embedded devices.
This example is a good starting point for integrating AI in embedded systems. The next steps include training your model to recognize additional keywords and implementing real-time keyword detection by incorporating a microphone into your system.

