Integration of Apple Pay into Drupal Commerce shop lets you add a safe, secure, and private payment method to your online store. It also increases user satisfaction since Apple Pay is the most popular wallet, with 383 million users worldwide.
If you're looking to extend the payment functionality of your Drupal Commerce store, keep reading a step-by-step guide to Apple Pay integration with a Drupal Commerce shop by our Drupal expert Vitalii Marchuk.
Tech requirements for Drupal Apple Pay integration
Before starting the Drupal Apple Pay integration process, make sure you adhere to the following tech requirements:
- All pages with Apple Pay should be served over HTTPS
- Your domain must have a valid SSL certificate
- Your server must support the TLS protocol version 1.2 or later.
For more details about tech requirements, see setting up your server on the Apple Developer website.
If your Drupal Commerce shop meets the above requirements, you can proceed to further steps of the Drupal Apple Pay integration process.
9 Steps to manage Drupal Apple Pay integration
We compiled a list of steps for seamless integration of Apple Pay into Drupal Commerce shops. Follow them to power your online store with this convenient payment method.
1. Verify your website domain
Before integrating Apple Pay into your Drupal Commerce shop, you’ll need to verify the domain of your website according to the following steps:
- Register top-level domains and sub-domains, which will display the Apple Pay button
- Download the Apple Pay verification file from the payment gateway API
- Place the domain validation file at:
https://{your-domain}/.well-known/apple-developer-merchantid-domain-association - To prevent interruptions in your website's Apple Pay service, your domain verification and the certificates you set up in Configuring Your Environment must remain valid. In contrast to your merchant ID, certificates and domain expire according to the following terms:
- Every 25 months for the Payment Processing certificate
- Every 25 months for the Merchant Identity certificate
- An SSL certificate expires simultaneously with the registered domain's verification.
Find more information here.
2. Check if your device supports Apple Pay
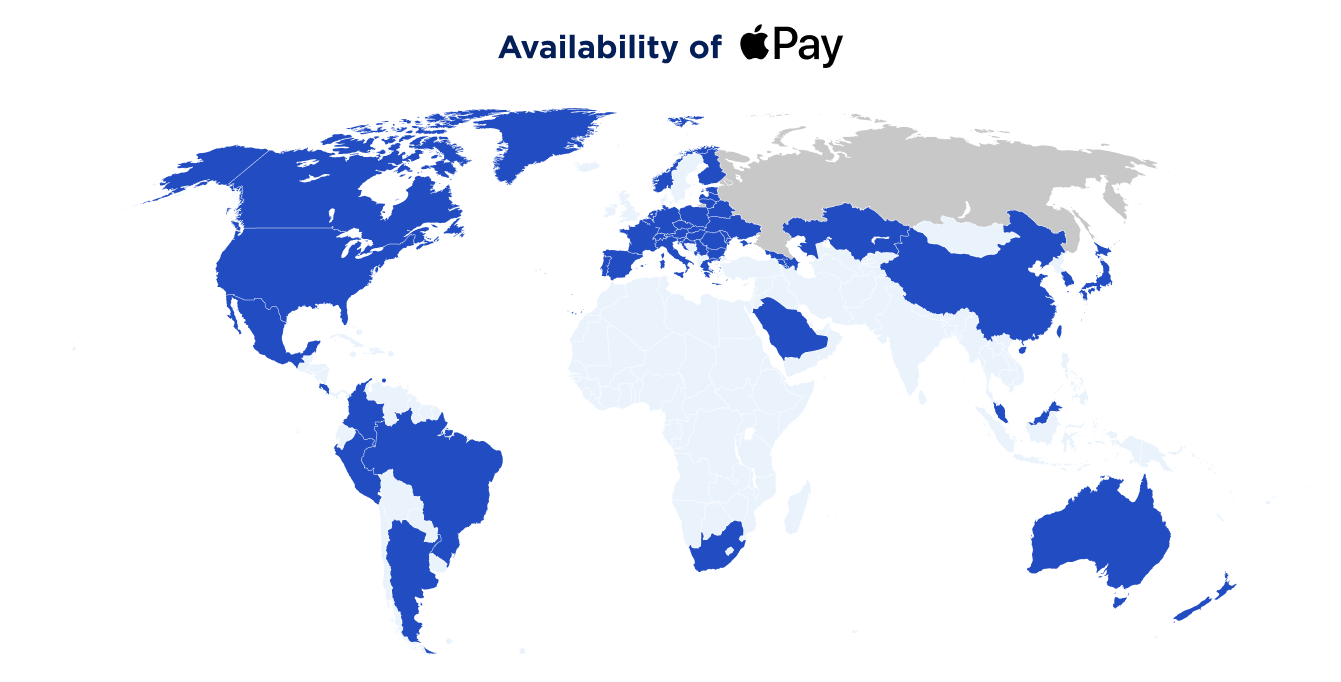
Before displaying an Apple Pay button in your store or creating an Apple Pay session, ensure the Apple Pay JS API is available and enabled on the used device. You can check the availability of Apple Pay based on the following criteria: country, iOS version, and user device.
To check the availability of the Apple Pay JS API in the browser, utilize the following listing and confirm the window.ApplePaySession class:
if (window.ApplePaySession && ApplePaySession.canMakePayments()) {
// The Apple Pay JS API is available.
}
Find more information at Apple Developer – Checking for Apple Pay availability.
3. Feature the Apple Pay button on a compatible device
After you verify Apple Pay support, display the Pay button on your checkout page. Apple Pay buttons should be displayed according to specific Apple guidelines:
- Use the type and style of an Apple Pay button that fits your app or website. Besides, you can display the availability of the payment option with an Apple Pay mark. You mustn't create a custom design of the Apple Pay button or invent buttons similar to the official ones.
- Opt for the button that suits your purchase and payment flows from available types of buttons.
Learn more about technical specifics of integrating an Apple Pay button into your Drupal Commerce shop CSS, JavaScript, API below.
Why create Apple Pay button using API?
Using system-provided Apple APIs enables you to get the following:
- An Apple-approved button with corresponding caption, font, color, and style
- Ideal proportions of the button contents as you resize it
- Self-activating translation into the device language
- Button's corner radius configuration to fit your UI
- VoiceOver description of the button.

How to display Apple Pay buttons using CSS?
Add an Apple Pay button element to your webpage to display the button. While adding the button, you'll need to set the style, type, and locale.
See an example code below that adds a black Buy with Apple Pay button localized to Greek, with the default size and corner radius:
<apple-pay-button buttonstyle="black" type="buy" locale="el-GR"></apple-pay-button>
The size and other attributes can be customized with the help of CSS. The following example adds the same Greek button with a height of 40 pixels, a width of 140 pixels, and a corner radius of 5 pixels. The height includes the top and bottom padding.
<style>
apple-pay-button {
--apple-pay-button-width: 140px;
--apple-pay-button-height: 30px;
--apple-pay-button-border-radius: 5px;
--apple-pay-button-padding: 5px 0px;
}
</style>
<apple-pay-button buttonstyle="black" type="buy" locale="el-GR"></apple-pay-button>
How to display Apple Pay buttons using JavaScript?
The transactions on your website can be managed with the help of a variety of Apple Pay buttons. Use attributes to configure the style, type, and localization of the Apple Pay button. Settle properties like size and corner radius using CSS as described above.
Load the button script into your webpage from the content delivery network using the following code:
<script src="https://applepay.cdn-apple.com/jsapi/v1/apple-pay-sdk.js"></script>
Check out Apple Developer for more information.
4. Create an Apple Pay session
Enabling an Apple Pay session is the next step in the integration of Apple Pay into your Drupal Commerce shop. At this stage, you initiate the payment session. If the data is successfully checked, you’ll see the pop-up that launches the payment process.
For this, follow the instructions below.
1. Create a paymentRequest object with all information about the order using JavaScript:
var ApplePayRequest = {
"countryCode": "NL",
"currencyCode": "EUR",
"merchantCapabilities": [
"supports3DS"
],
"supportedNetworks": [
"amex",
"maestro",
"masterCard",
"visa"
],
"requiredBillingContactFields":[
"postalAddress",
"billingAddress"
],
"total":{
"label": "Your Merchant Name",
"type": "final",
"amount": 15.95
}
};
To learn more about the ApplePayRequest object, see Apple Developer – ApplePayRequest.
2. Create an Apple Pay session with JavaScript:
var session = new ApplePaySession (2, ApplePayRequest);
- As the first argument, choose the Apple Pay version your website supports
- As the second argument, forward the ApplePayRequest object.
To find more information, check Apple Developer – Creating an Apple Pay session.
5. Set up the onvalidatemerchant callback
After the payment sheet is displayed, the callback function onvalidatemerchant is automatically activated using an event object. Apple can verify the capacity to accept Apple Pay on your platform by initiating merchant validation. In practice, this process involves choosing the payment card by the client and its validation by the platform.
JavaScript:
session.onvalidatemerchant = function (event) {
var validationUrl = event.validationURL;
var originDomain = window.location.hostname;
// Request an Apple Pay merchant session using your server.
// The server-side request demands the validationUrl and originDomain values.
// If you succesfully create a session from your server.
session.completeMerchantValidation(<apple-pay-payment-session-data>);
};
Find more information at Apple Developer:
6. Set up the onpaymentauthorized callback
Introducing the onpaymentauthorized callback is another step to integrating Apple Pay into your Drupal commerce store. When a buyer authorizes a payment (using a Touch ID or Face ID), the callback function onpaymentauthorized is immediately activated with an event object.
Check the flow of onpaymentauthorized callback:
- Get the payment token “event.payment”
- Send the payment token to your server
- Base64 encode the payment token
- Send the encoded payment token to Payment Gataway
- Depending on Payment Gataway's response, update the client
- Forward an appropriate status code to your session's “completePayment” method
- Target the buyer to the appropriate page (i.e. order confirmation page).
JavaScript:
function applePayClicked() {
session.onpaymentauthorized = function(event) {
var paymentToken = event.payment;
// Store the token in the form element.
session.completePayment(ApplePaySession.STATUS_SUCCESS);
// Redirect or click the button.
window.location.href = "/success.html";
};
}
7. Show the payment sheet
After adding all event handlers, call the begin method to show the payment sheet to the client. Keep in mind that if the client doesn't explicitly request the session (i.e., inside a click event), the begin method will forward a JavaScript exception. After this process is launched, the payment is either accepted or rejected.
JavaScript:
session.begin();
After the begin method is requested, your session's onvalidatemerchant callback function is automatically launched. The other callback functions are activated after corresponding events are triggered as the client proceeds through checkout.
8. Testing ApplePay integration in Sandbox
Next, you'll need to test your Apple Pay flow using Sandbox. Mind that you must use a compatible device.
You should also mind the device region. Before testing the cards, set the device to a country supporting Apple Pay. Currently, Apple supports testing in the countries listed here.
Note:
- We advise you to use real devices to test the Apple Pay flow, because a simulator may fail to process the transaction.
- Your device region must be set to the United States if you want o test Amex cards.
- Log in to the iCloud account on each testing device (i.e. MacBook, iPhone, Apple Watch). You can also find out how to connect Apple Devices using Handoff at Apple's Support website.
To add a test card to your Apple Pay wallet follow the instructions listed below:
- Open the Settings app and tap iCloud at the top on the iOS device you're using for testing. Tap Sign Out button at the bottom if you're signed in
- Log in using the iCloud credentials
- Tap Back to return to the initial page of the Settings app
- Tap Wallet & Apple Pay
- Tap Add Credit or Debit Card. You'll be prompted to photograph your card. Tap Enter Card Details Manually instead
- Enter one of the test cards listed here.
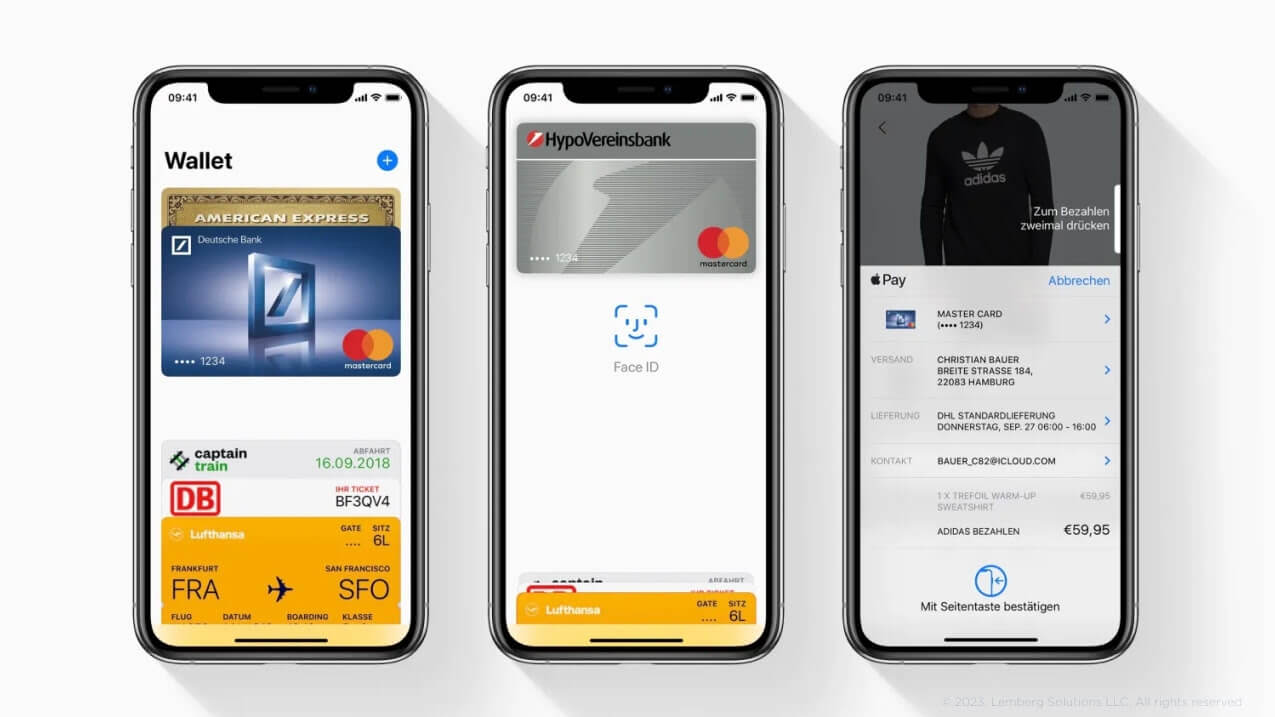
9. Manage Apple Pay integration in Drupal Commerce
While the previous points describe in detail each step of the Apple Pay integration with Drupal Commerce, the final one describes the very tech integration.
For a more general introduction to Drupal Commerce payments, see the Payments documentation page.
Create “Payment method type” plugin:
- A new payment method type must extend CreditCard payment method type
- There is no need to store any specific information; you can change any of the available methods if necessary.
/**
* Provides the Apple Pay payment method type.
*
* @CommercePaymentMethodType(
* id = "apple_pay",
* label = @Translation("Apple Pay"),
* )
*/
class ApplePay extends CreditCard {
}
Create “Payment gateway” plugin:
- A new payment gateway must extend OnsitePaymentGataweyBase class
- Add to payment_method_types new “Payment method type” In the payment gateway definitions array
- You can also add js_library definition with a path to your custom JS library
- Define configurations form settings required by payment gateway
- In the createPayment method, process the payment according to Payment Gateway API
- Other methods can be defined if necessary.
/**
* Provides the ApplePay payment gateway.
*
* @CommercePaymentGateway(
* id = "applepay_onsite",
* label = @Translation("ApplePay Onsite Payment Gateway"),
* display_label = "ApplePay",
* forms = {
*"add-payment-method"="Drupal\module_name\PluginForm\PaymentMethodAddForm",
* },
* js_library = "module_name/apple-pay",
* payment_method_types = {"apple_pay"},
* credit_card_types = {
* "amex", "dinersclub", "discover", "jcb", "mastercard", "visa",
* },
* requires_billing_information = FALSE,
* )
*/
class ApplePayOnsite extends OnsitePaymentGatewayBase implements PaymentGatewayInterface{
/**
* {@inheritdoc}
*/
public function createPayment(PaymentInterface $payment, $capture = TRUE) {
$this->assertPaymentState($payment, ['new']);
$payment_method = $payment->getPaymentMethod();
$this->assertPaymentMethod($payment_method);
$order = $payment->getOrder();
// Process the payment according to Payment Gateway API.
// Mark the payment as completed.
$next_state = $capture ? 'completed' : 'authorization';
$payment->setState($next_state);
$payment->setRemoteId($remote_id);
$payment->save();
}
}
Create “Payment method add” form (Drupal\module_name\PluginForm\PaymentMethodAddForm):
- A new payment method add form must extend PaymentMethodAddForm or BasePaymentMethodAddForm classes
/**
* Payment method add form.
*/
class PaymentMethodAddForm extends BasePaymentMethodAddForm {
/**
* {@inheritdoc}
*/
public function buildConfigurationForm(array $form, FormStateInterface $form_state) {
$form = parent::buildConfigurationForm($form, $form_state);
$payment_method = $this->entity;
if ($payment_method->bundle() === 'apple_pay') {
$form['payment_details'] = $this->buildApplePayForm($form['payment_details'], $form_state);
}
return $form;
}
/**
* {@inheritdoc}
*/
public function buildApplePayForm(array $element, FormStateInterface $form_state) {
$plugin=$this->plugin;
$checkout_flow = $form_state->getFormObject();
$order = $checkout_flow->getOrder();
$element['#attached']['drupalSettings']['commerceApplePay'] = [
'clientToken' => $plugin->generateClientToken(),
'currencyCode' => $order->getTotalPrice()->getCurrencyCode(),
'totalPrice' => (string) round($order->getTotalPrice()->getNumber(), 2),
'countryCode' => $order->getStore()->getAddress()->getCountryCode(),
'storeName' => $order->getStore()->label(),
'orderId' => $order->id(),
];
$lang = \Drupal::languageManager()->getCurrentLanguage()->getId();
$element['apple_pay'] = [
'#type' => 'container',
'#id' => apple-pay-button',
'#suffix' => Markup::create('<apple-pay-button buttonstyle="black" type="plain" locale="' . $lang . '"></apple-pay-button>')
];
// Populated by the JS library.
$element['payment_method_nonce'] = [
'#type' => 'hidden',
'#attributes' => [
'class' => ['apple-pay-nonce'],
],
];
return $element;
}
}
Create a new library for Apple Pay related JS functionality
- In the module_name.libraries.yml file, add the following JS libraries:
applepay-checkout:
version: 1
license:
name: MIT
gpl-compatible: true
js:
https://applepay.cdn-apple.com/jsapi/v1/apple-pay-sdk.js: { type: external, minified: true }
apple-pay:
version: VERSION
js:
js/module_name.apple_pay.js: {}
dependencies:
- classy/messages
- core/jquery
- core/drupal
- core/jquery.once
- module_name/applepay-checkout
Apple Pay JS implementation
var $submit = $form.find(':input.button--primary');
var paymentButton = document.querySelector('apple-pay-button');
if (!window.ApplePaySession || !ApplePaySession.supportsVersion(2)) {
// Show error message “This device does not support Apple Pay”
// Disable the Continue button.
$submit.attr("disabled", "disabled");
return;
}
if (!ApplePaySession.canMakePayments()) {
// Show error message “This device is not capable of making Apple Pay payments”
// Disable the Continue button.
$submit.attr("disabled", "disabled");
return;
}
// Initialize the client.
paymentButton.addEventListener('click', function (event) {
var paymentRequest = {
countryCode: settings.countryCode,
currencyCode: settings.currencyCode,
total: {
label: 'Order ' + settings.orderId,
type: 'final',
amount: settings.totalPrice
},
supportedNetworks: [
'amex',
'discover',
'jcb',
'masterCard',
'visa'
],
merchantCapabilities: ['supports3DS', 'supportsEMV', 'supportsCredit', 'supportsDebit'],
requiredBillingContactFields: [],
requiredShippingContactFields: ['email']
};
var session = new ApplePaySession(2, paymentRequest);
session.onvalidatemerchant = function (event) {
// Here we need to run validation on the payment gateway server.
FunctionName({
validationURL: event.validationURL
}, function (validationErr, validationData) {
if (validationErr) {
console.error(validationErr);
// Show error message validationErr.
session.abort();
return;
}
session.completeMerchantValidation(validationData);
});
};
session.onpaymentauthorized = function(event) {
var token = event.payment.token;
// Run the payment token validation and return ApplePaySession.STATUS_FAILURE
// or ApplePaySession.STATUS_SUCCESS.
if (!token) {
session.completePayment(ApplePaySession.STATUS_FAILURE);
// Show error message ApplePaySession.STATUS_FAILURE
return;
}
$('.apple-pay-nonce').val(token);
// Once the transaction is complete, call completePayment
// to close the Apple Pay sheet.
session.completePayment(ApplePaySession.STATUS_SUCCESS);
$submit.prop('disabled', false);
};
session.begin();
});
Check out an Apple Pay interactive demo at https://applepaydemo.apple.com/.
Final words
The above steps will help you integrate Apple Pay into your Drupal Commerce shop quickly and efficiently. If you are looking to add any custom features and functionalities to your ecommerce platform, we can provide you with our Drupal development services. Don't hesitate to contact us and our experts will get back to you shortly to discuss your specific needs.


