Today, computer vision is no longer considered something uncommon. We are all accustomed to the fact that modern cars can see the road and surrounding objects at the human level, or at least at a level sufficient for autonomous driving. Surveillance cameras around the city can distinguish cars and record their numbers or count people. In short, this technology is already deeply embedded in our everyday life. With its help, we make the world a safer place to live, and you can use computer vision in your business too.
I wrote this article to share how to develop a computer vision system for an Android app. You will learn how to train a model to detect a certain object, prepare data for training, and inject this model into your own application for Android. It may seem that the problem I discuss here is not new, but in this article, I will cover the whole process, starting from data collection and ending with model integration.
Let's set our goal: we want to train a neural model to detect car wheels after defining the dataset and integrate this model into our Android application, which will display the detection result in a real-time camera preview screen. Sounds like something you might want to develop, right? Dive in then!

Framework/technology
There are several frameworks capable of running on Android, such as TensorFlow/TensorFlow Lite, PyTorch/Mobile, and OpenCV. TensorFlow is a framework maintained by Google, as well as Android, which is why TensorFlow has good support on the Android platform. For example, the Google Lens application uses the TensorFlow framework, so you can safely stick to it.
To be clear, we will use the TensorFlow framework for model training, then we will convert the model into the TensorFlow Lite format and run it on an Android device. To configure the training machine, I will use a PC running Windows 11 Pro with Intel I9 9900K CPU, 32Gb of memory, Asus TUF GeForce RTX 3070 Ti GPU, and an SSD drive. You can also use any other configuration, even cloud environments like Amazon EC2. If choosing a PC, note that the NVIDIA GPU is almost mandatory because training only on a CPU is dramatically slower. TensorFlow is a ML framework providing a set of ready-to-use models, so our task is reduced to selecting appropriate models and using provided tools for training them.
More specifically, we will use the TensorFlow Object Detection API and a model from GitHub. Although there is information about the models’ performance and accuracy, GitHub doesn’t provide any data about compatibility of these models with Android (here is the discussion of some models’ performance on Android). Currently, the best option is to use the well-known SSD MobileNet V2 FPNLite 320x320 model. If you want to learn more about different model types, check The Object Detection Landscape: Accuracy vs Runtime.
One more thing to note: At the moment, the latest TensorFlow framework version 2.9.1 is incompatible with the Android libraries which we are going to use, so we will use the latest compatible version 2.5.0.
Installation
First, you should Install the latest Miniconda package. Then, open Anaconda prompt by typing anaconda in Start Menu search and create Conda environment:
conda create -n tf250Activate created environment:
conda activate tf250Install TensorFlow package:
conda install tensorflow==2.5.0Ensure that everything works fine:
python3 -c "import tensorflow as tf; print(tf.__version__)"The output should be the following:
2.5.0The next time you work with TensorFlow, launch the Anaconda prompt and activate the tf250 environment in the same way. Without additional software, the installed TensorFlow package will only run on the CPU; to run it on a GPU, you need to proceed with the following steps:
1. Install tensorflow-gpu package:
conda install tensorflow-gpu==2.5.02. Install the latest NVidia Graphics Card driver. Download the corresponding driver, then follow the steps in the installation wizard.
3. Install the Cuda Toolkit. According to the table of component versions conformity, TensorFlow 2.5.0 requires cuDNN 8.1 and CUDA 11.2. However, during installation of the tensorflow-gpu package, in my case, additional Python packages cudatoolkit-11.3.1 and cudnn-8.2.1.32 were installed. This means that we can install CUDA 11.3.1 and cuDNN 8.2.1.
Note that before installing the CUDA Toolkit, you will need Microsoft Visual Studio to work correctly. Without Visual Studio, you will see the following warning:
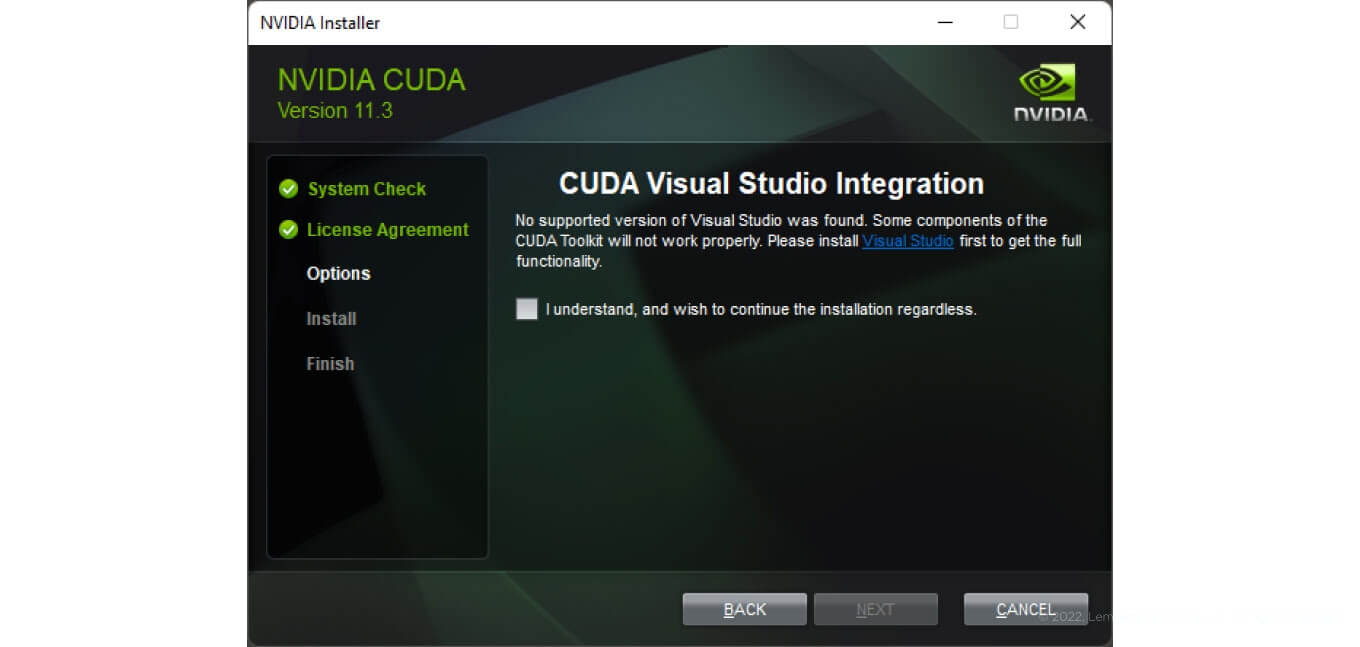
To fulfill this requirement, download and install Microsoft Visual Studio Express.
Afterwards, download CUDA Toolkit and install it by following the installation wizard. If you have already installed the graphics card driver, then check Custom installation and unselect Driver components:
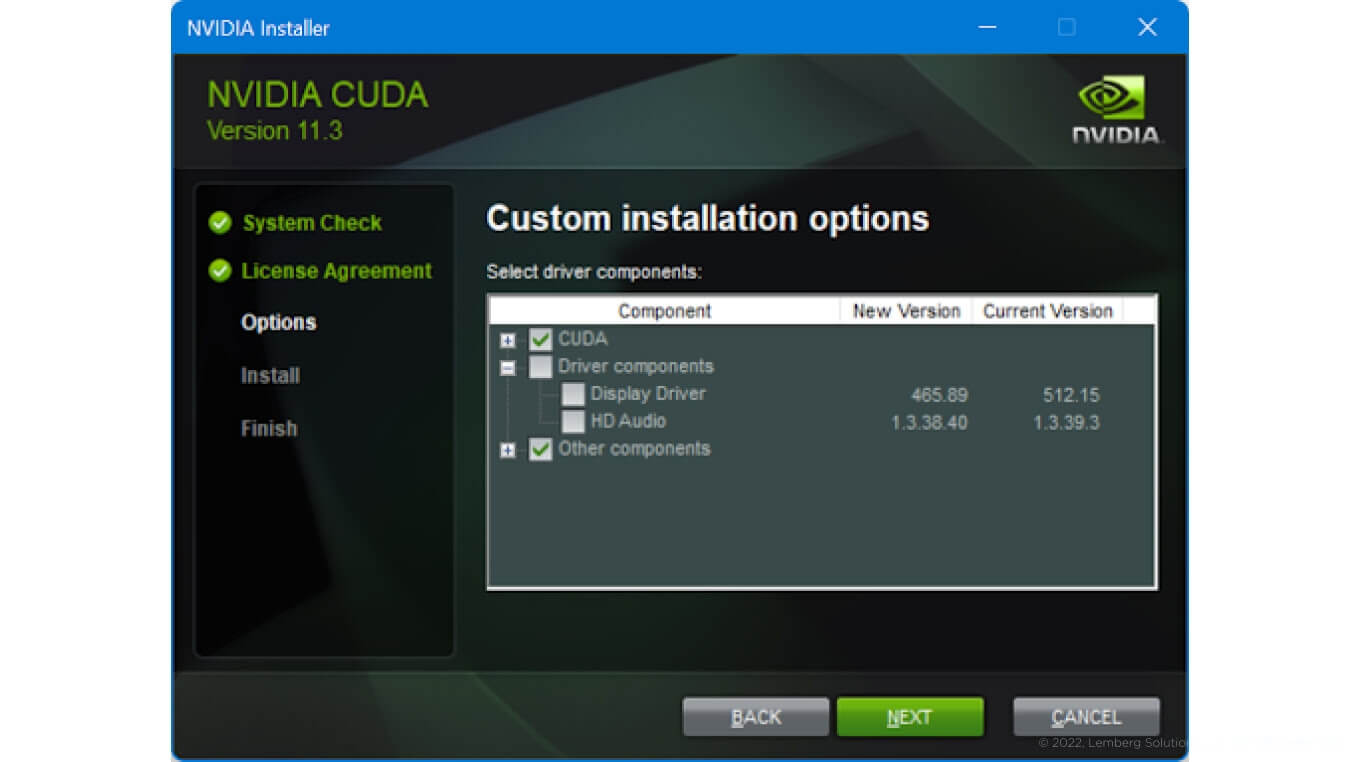
The last thing needed for TensorFlow GPU is a development library cuDNN, and NVIDIA requires you to be registered there to download it. Register and download cuDNN version 8.2.1 in the archives section (or the file cuDNN Library for Windows (x86) for Windows system). Finally, extract the downloaded archive and copy the content of the cuda directory (in my case it contains bin, include, and lib directories plus one text file) into the CUDA Toolkit installation directory (in my case it was C:\Program Files\NVIDIA GPU Computing Toolkit\CUDA\v11.3). You will need administrative permissions for this.
The biggest part is done. Now, check what devices are available for TensorFlow:
python3 -c "import tensorflow as tf;
print(tf.config.list_physical_devices())"
If the output is:
[PhysicalDevice(name='/physical_device:CPU:0', device_type='CPU')]then the environment for the GPU is not configured correctly. I got the following output:
2022-06-08 23:47:21.754211: I
tensorflow/stream_executor/platform/default/dso_loader.cc:53]
Successfully opened dynamic library cudart64_110.dll
2022-06-08 23:47:23.412601: I
tensorflow/stream_executor/platform/default/dso_loader.cc:53]
Successfully opened dynamic library nvcuda.dll
2022-06-08 23:47:23.423566: I tensorflow/core/common_runtime/gpu/gpu_device.cc:1733] Found device 0
with properties:
pciBusID: 0000:01:00.0 name: NVIDIA GeForce RTX 3070 Ti
computeCapability: 8.6
coreClock: 1.785GHz coreCount: 48 deviceMemorySize: 8.00GiB
deviceMemoryBandwidth: 566.30GiB/s
2022-06-08 23:47:23.423664: I
tensorflow/stream_executor/platform/default/dso_loader.cc:53]
Successfully opened dynamic library cudart64_110.dll
2022-06-08 23:47:23.429802: I
tensorflow/stream_executor/platform/default/dso_loader.cc:53]
Successfully opened dynamic library cublas64_11.dll
2022-06-08 23:47:23.429874: I
tensorflow/stream_executor/platform/default/dso_loader.cc:53]
Successfully opened dynamic library cublasLt64_11.dll
2022-06-08 23:47:23.432529: I
tensorflow/stream_executor/platform/default/dso_loader.cc:53]
Successfully opened dynamic library cufft64_10.dll
2022-06-08 23:47:23.433567: I
tensorflow/stream_executor/platform/default/dso_loader.cc:53]
Successfully opened dynamic library curand64_10.dll
2022-06-08 23:47:23.437346: I
tensorflow/stream_executor/platform/default/dso_loader.cc:53]
Successfully opened dynamic library cusolver64_11.dll
2022-06-08 23:47:23.440262: I
tensorflow/stream_executor/platform/default/dso_loader.cc:53]
Successfully opened dynamic library cusparse64_11.dll
2022-06-08 23:47:23.440838: I
tensorflow/stream_executor/platform/default/dso_loader.cc:53]
Successfully opened dynamic library cudnn64_8.dll
2022-06-08 23:47:23.440928: I
tensorflow/core/common_runtime/gpu/gpu_device.cc:1871] Adding visible gpu devices: 0
[PhysicalDevice(name='/physical_device:CPU:0', device_type='CPU'),
PhysicalDevice(name='/physical_device:GPU:0', device_type='GPU')]
If during training you encounter the following error:
NotImplementedError: Cannot convert a symbolic Tensor
(cond_2/strided_slice:0) to a numpy array. This error may indicate that you're trying to pass a Tensor to a NumPy call, which is not supported
you will need to apply a fix on TensorFlow installation files.
And basically you will need to edit the file C:\Users\RII\miniconda3\envs\tf250\Lib\site-packages\tensorflow\python\ops\array_ops.py (this path corresponds to my environment, in your case it may be different) in the following way:
1. Add new line:
from tensorflow.python.ops.math_ops import reduce_prod2. Edit line 95 and change
if np.prod(shape) < 1000:to
if reduce_prod(shape) < 1000:Now we have the TensorFlow framework installed in the Conda virtual environment.
Another important thing we need to install is TensorFlow Models. Clone this repository somewhere on your machine, for example in c:\develop\projects directory (github.com/tensorflow/models.git):
cd c:\develop\projects
git clone
Next, install the object detection Python package from this repository into the Conda environment. Since this package from the master branch does not fit well into our TensorFlow 2.5.0 environment, check-out this branch instead:
cd models
git checkout 66264b23
This branch ID was found empirically; if you have checked other commits and found they worked well, don’t hesitate to let me know.
It’s time to install the Protoc compiler to build some scripts.
Install it by downloading the latest package (like protoc-21.1-win64.zip) for your platform from here and unpack it somewhere not too deep in the directory structure (for example c:\develop\projects\protoc in my case). Add this path (plus \bin ending) to the user’s environment variables for easy access:
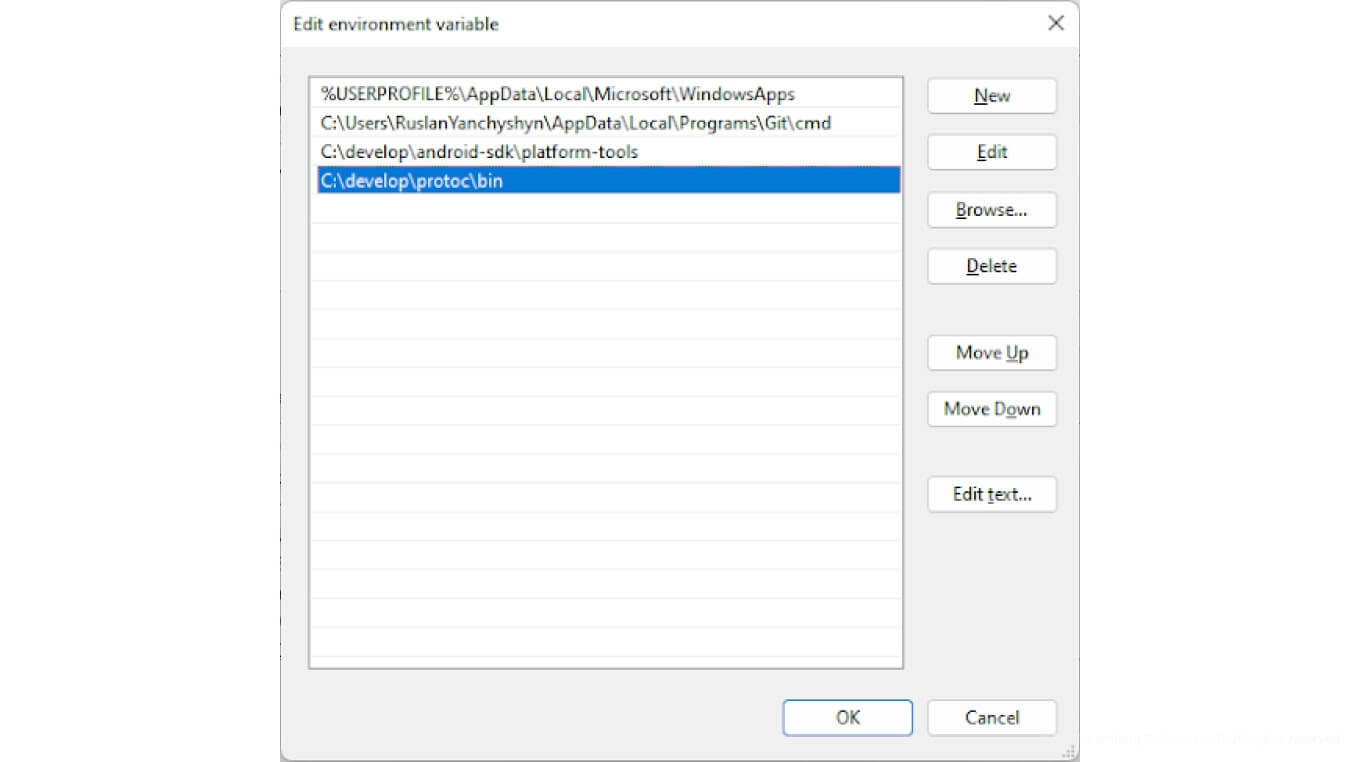
Also add the environment variable OBJ_DETECT, pointing to the Object Detection directory (like C:\projects\work\tensorflow_models\models\research\object_detection in my case). This variable will be used by our build scripts.
Build python scripts from within models\research directory
protoc object_detection/protos/*.proto --python_out=.Copy the setup script into the work location:
copy object_detection\packages\tf2\setup.py .Now we are ready to install this package. But this package has a dependency to tf-models-official and tensorflow_io packages, which in turn have dependencies to the recent version of TensorFlow. To work around this issue, adjust dependencies for our object_detection package by editing setup.py in the current directory as follows:
'tf-models-official==2.5.0',
'tensorflow_io==0.19.1',
Now we are ready to install the object_detection package:
python3 -m pip install .And finally, install the additional TensorFlow Lite support package:
pip install tflite_support==0.4.1Dataset
Image extraction
Just a reminder: our goal is to train the model for Object Detection i.e., localization of vehicle wheels by bounding boxes on an image — or rather on a video stream, to be precise.
To train the model we need a bunch of images with visible vehicle wheels. An even better option is to use videos with moving vehicles. Extracted frames from such videos will fill the dataset with images of different points of view, increasing the awareness of a model.
You can record such videos yourself using a smartphone.
I already recorded such videos and extracted frames so you could download them.
To extract frames from a video I used the FFmpeg console application:
ffmpeg.exe -i video.mp4 image_%08d.pngYou may also specify some lower frame rate in order to get a more sparse set of images:
ffmpeg.exe -i video.mp4 -vf "fps=10" image_%08d.pngWhere video.mp4 is input video file, and image_%08d.png is a pattern for output files, producing files like image_00000001.png, image_00000002.png, image_00000003.png…
“fps” parameter specifies the frame rate for extraction. If the video frame rate is 30, then specifying fps=10 will extract only ⅓ of all frames.
If you recorded several videos, run frames extraction for each video in a separate directory, so in the end you will have a directory structure like this:
+---img_range
|   	range_00000000.png
|   	range_00000001.png
|   	range_00000002.png
|   	range_00000003.png
|   	range_00000004.png
|   	...
+---img_range2
|   	range2_00000000.png
|   	range2_00000001.png
|   	range2_00000002.png
|   	range2_00000003.png
|   	...
\---img_wheels
    	wheel_00000000.png
    	wheel_00000001.png
    	wheel_00000002.png
    	wheel_00000003.png
    	...
Where img_range, img_range2 and img_wheels are directories with extracted images from my 3 videos.
Labeling
Labeling is a process of marking target objects on a source material (in our case it is images). Labeling is usually done by employing specific applications or services. The results of labeling must be stored somewhere, depending on the application used.
Popular labeling applications include LabelImg, Label-Studio, and DarkLabel. Your application choice will depend on several aspects, such as platform, label format, supported source materials format, option for cooperative work, and labeling performance in terms of how easy it is to label an entry. I would focus on the DarkLabel application that runs on Windows platform, supports many image formats, including Pascal VOC label format, and has a well-designed UI that, in conjunction with the label predictor, results in very high labeling performance. Take a look at the example:
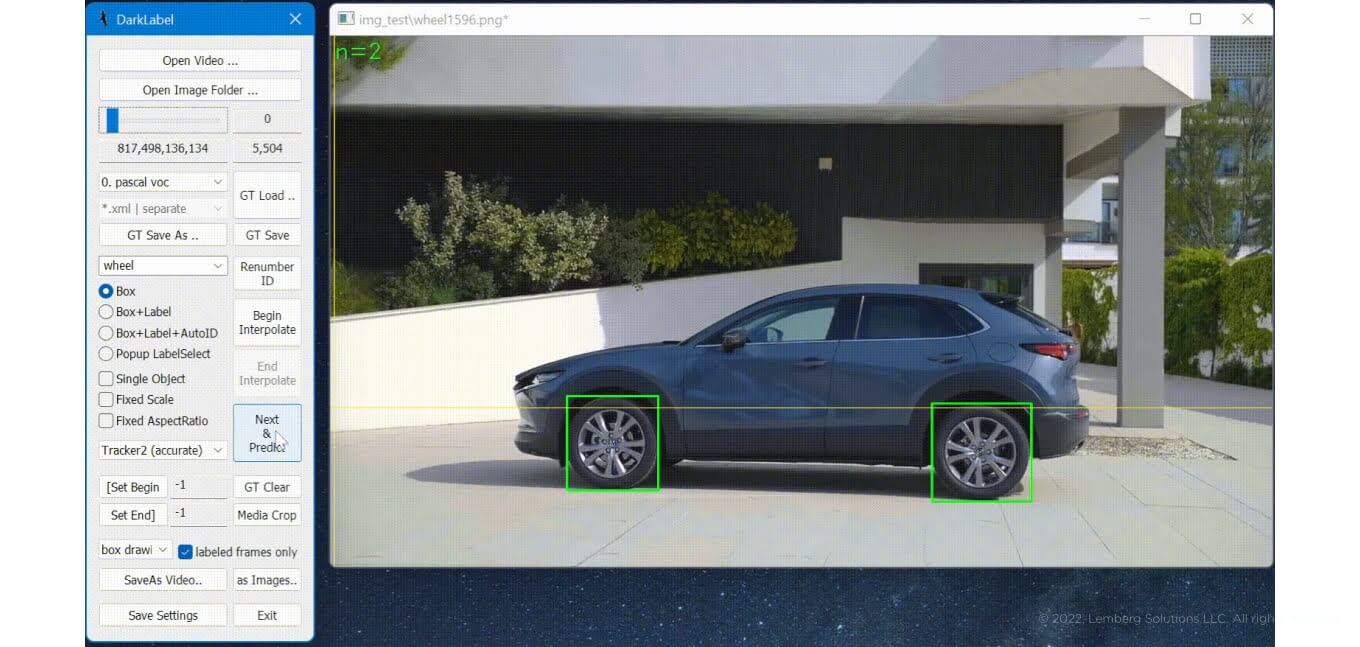
The downside of this application is its support for Windows only and the lack of cooperative work support; however, this can be done on a file system level (i.e., place images/labels on network share and work with them by mounting them on different machines).
Label at least 100-500 images using this utility: select labeling format pascal voc, define custom label wheel, set tracker to Tracker2 (accurate), label all target images and save the results by clicking on GT save button. In the end, you will get an accompanying “xml” file with each labeled image.
Converting into TensorFlow format
The “object detection” package works only with the TensorFlow-specific data format. This means that we need to convert all our images with label files into the TensorFlow format.
Launch this script with a list of directories containing the dataset, like this:
The result of this conversion is two files: train.tfrecord and test.tfrecord. The first file contains all the data for the training phase, and the second file contains all the data for the validation phase. Note that the train/test split coefficient is set to 0.9 directly in create_tf.py script. Remember that the dataset classes are hardcoded in this script (see class_text_to_int method), so if you have different classes, adjust this method.
I also converted my extracted frames into tfrecord format.
Training
At this point, we have almost all the data prepared for the training. Download the project skeleton that contains a preparation set and build scripts along with a demo Android application.
Now that you’ve downloaded it, proceed with the following steps:
1. Download the pre-trained model and its configuration files “SSD MobileNet V2 FPNLite 320x320” (if the link has been changed, search for it in the next one) from TensorFlow 2 Detection Model Zoo and extract into your working directory.
2. Create a “labels_map.pbtxt” file in the working directory in JSON format. The content of the file is the following:
item {
    id: 1
    name: 'wheel'
}
If you have different classes, adjust it (this file should correspond to class_text_to_int method, see the previous block).
3. Adjust the configuration file “pipeline.config” for the extracted pre-trained model in the following way (I just provide attribute names, so search in the text for them):
a) num_classes: 1
b) max_detections_per_class: 1
c) max_total_detections: 1
d) batch_size: 2
e)
data_augmentation_options {
    random_vertical_flip {
    }
  }
  data_augmentation_options {
    random_rotation90 {
    }
  }
  data_augmentation_options {
    random_patch_gaussian {
    }
  }
  data_augmentation_options {
    random_crop_image {
      min_aspect_ratio: 0.75
      max_aspect_ratio: 1.5
      random_coef: 0.25
    }
  }
  data_augmentation_options {
    random_adjust_hue {
    }
  }
  data_augmentation_options {
    random_adjust_contrast {
    }
  }
  data_augmentation_options {
    random_adjust_saturation {
    }
  }
  data_augmentation_options {
    random_adjust_brightness {
    }
  }
f) total_steps: 200000
g) fine_tune_checkpoint: "ssd_mobilenet_v2_fpnlite_320x320_coco17_tpu-8\\checkpoint\\ckpt-0"
h) num_steps: 200000
i) max_number_of_boxes: 1
j) fine_tune_checkpoint_type: "detection"
k)
train_input_reader {
  label_map_path: "labels_map.pbtxt"
  tf_record_input_reader {
    input_path: "dataset\\train.tfrecord"
  }
}
l)
eval_input_reader {
  label_map_path: "labels_map.pbtxt"
  shuffle: false
  num_epochs: 1
  tf_record_input_reader {
    input_path: "dataset\\test.tfrecord"
  }
}
4. Launch the training by executing the script:
python %OBJ_DETECT%\model_main_tf2.py --model_dir=out_train --pipeline_config_path=ssd_mobilenet_v2_fpnlite_320x320_coco17_tpu-8/pipeline.configwhere out_train is the output directory for the resulting model. If everything is correct, you will see the training progress in the console will take several hours, depending on your GPU computation power (it took around 8 hours for me).
5. Freeze the model
Output directory will hold the results in an “unfrozen” format, meaning that all the data is unfrozen and the model can be changed in any way. This format is essential for the training phase, but it is uncommon to use the model in this format for inference purposes (i.e. running the model for detection). One more step is needed to freeze the model. Execute this script:
python %OBJ_DETECT%\exporter_main_v2.py --input_type image_tensor --pipeline_config_path ssd_mobilenet_v2_fpnlite_320x320_coco17_tpu-8\pipeline.config --trained_checkpoint_dir out_train --output_directory out_exportwhere out_train is our output directory from the previous step and out_export is the output directory that will hold the frozen model. Adjust the path to tensorflow_models directory if needed.
At the end, we will have the following directory structure:
OUT_EXPORT
│   pipeline.config
├───checkpoint
│       checkpoint
│       ckpt-0.data-00000-of-00001
│       ckpt-0.index
└───saved_model
    │   saved_model.pb
    ├───assets
    └───variables
            variables.data-00000-of-00001
            variables.index
6. Evaluation
Now, we can check training results by launching the TensorBoard application:
tensorboard --logdir=out_train
By opening this URL, we will observe the following screen:
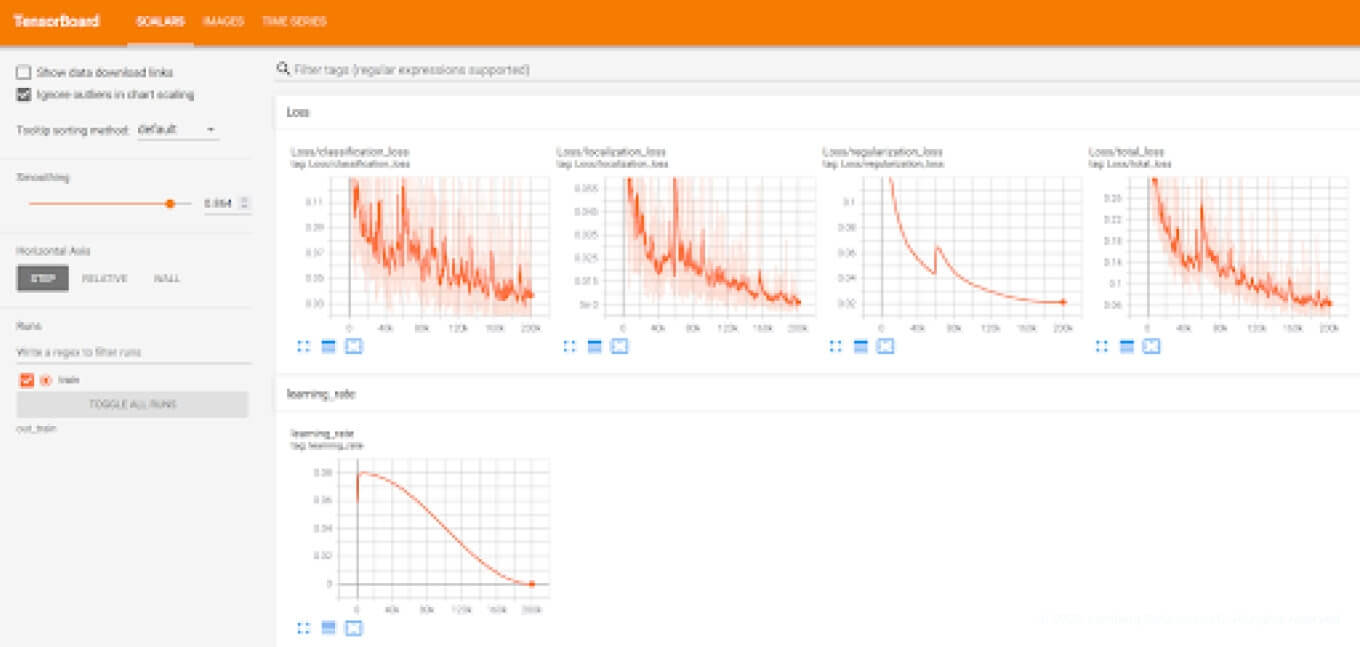
From this picture, we can see that “classification,” “localization,” and “total” loss values dropped down to almost zero, which means that the model was trained well.
Converting the resulting model into TensorFlow Lite
Since Android doesn’t support TensorFlow models out of the box, we need to convert the resulting model into the TensorFlow Lite format.
Converting wll be done in several steps:
1. Convert the model into the intermediate format using this script:
python %OBJ_DETECT%\export_tflite_graph_tf2.py --trained_checkpoint_dir out_export\checkpoint --output_directory out_tflite_intermediate --pipeline_config_path out_export\pipeline.config2. Create an output directories:
mkdir out_tflite
mkdir out_tflite_intermediate
3. Convert from the intermediate format into the resulting TensorFlow Lite format:
python convert_to_tflite.py --tf_lite_model=out_tflite/model.tflite --tf_dataset=dataset/train.tfrecord --intermed_dir=out_tflite_intermediate/saved_modelNote that this script also takes a path to the training dataset. It is needed to perform optimizations during conversion.
4. Add metadata to the resulting TensorFlow Lite model:
python add_tflite_metadata.py --tf_lite_model=out_tflite/model.tflite --tf_lite_model_out=out_tflite/model_with_metadata.tflite --labels_map=labels_map.pbtxt --labels_map_out=out_tflite/tflite_labels_map.txtOr, instead of these commands, simply execute this script. If everything went well, you would see this output:
Metadata populated:
{
  "name": "ObjectDetector",
  "description": "Identify which of a known set of objects might be present and provide information about their positions within the given image or a video stream.",
  "subgraph_metadata": [
    {
      "input_tensor_metadata": [
        {
          "name": "image",
          "description": "Input image to be detected.",
          "content": {
            "content_properties_type": "ImageProperties",
            "content_properties": {
              "color_space": "RGB"
            }
          },
          "process_units": [
            {
              "options_type": "NormalizationOptions",
              "options": {
                "mean": [
                  127.5
                ],
                "std": [
                  127.5
                ]
              }
            }
          ],
          "stats": {
            "max": [
              1.0
            ],
            "min": [
              -1.0
            ]
          }
        }
      ],
      "output_tensor_metadata": [
        {
          "name": "location",
          "description": "The locations of the detected boxes.",
          "content": {
            "content_properties_type": "BoundingBoxProperties",
            "content_properties": {
              "index": [
                1,
                0,
                3,
                2
              ],
              "type": "BOUNDARIES"
            },
            "range": {
              "min": 2,
              "max": 2
            }
          },
          "stats": {
          }
        },
        {
          "name": "category",
          "description": "The categories of the detected boxes.",
          "content": {
            "content_properties_type": "FeatureProperties",
            "content_properties": {
            },
            "range": {
              "min": 2,
              "max": 2
            }
          },
          "stats": {
          },
          "associated_files": [
            {
              "name": "tflite_labels_map.txt",
              "description": "Labels for categories that the model can recognize.",
              "type": "TENSOR_VALUE_LABELS"
            }
          ]
        },
        {
          "name": "score",
          "description": "The scores of the detected boxes.",
          "content": {
            "content_properties_type": "FeatureProperties",
            "content_properties": {
            },
            "range": {
              "min": 2,
              "max": 2
            }
          },
          "stats": {
          }
        },
        {
          "name": "number of detections",
          "description": "The number of the detected boxes.",
          "content": {
            "content_properties_type": "FeatureProperties",
            "content_properties": {
            }
          },
          "stats": {
          }
        }
      ],
      "output_tensor_groups": [
        {
          "name": "detection_result",
          "tensor_names": [
            "location",
            "category",
            "score"
          ]
        }
      ]
    }
  ],
  "min_parser_version": "1.2.0"
}

=============================
Associated file(s) populated:
['tflite_labels_map.txt']
The resulting file out_tflite\model_with_metadata.tflite, suitable for integration into Android applications, will be created.
Android application
At this point, we have a TensorFlow Lite model aiming to detect vehicle wheels. Let’s create an Android application that will utilize the model and perform real-time detection on the stream from the camera. The complete application can be found here. I won’t cover camera capturing in detail; let's check how to integrate the model for our needs instead.
ML Binding
The first option is to use ML Binding and import the model using Android Studio menu:
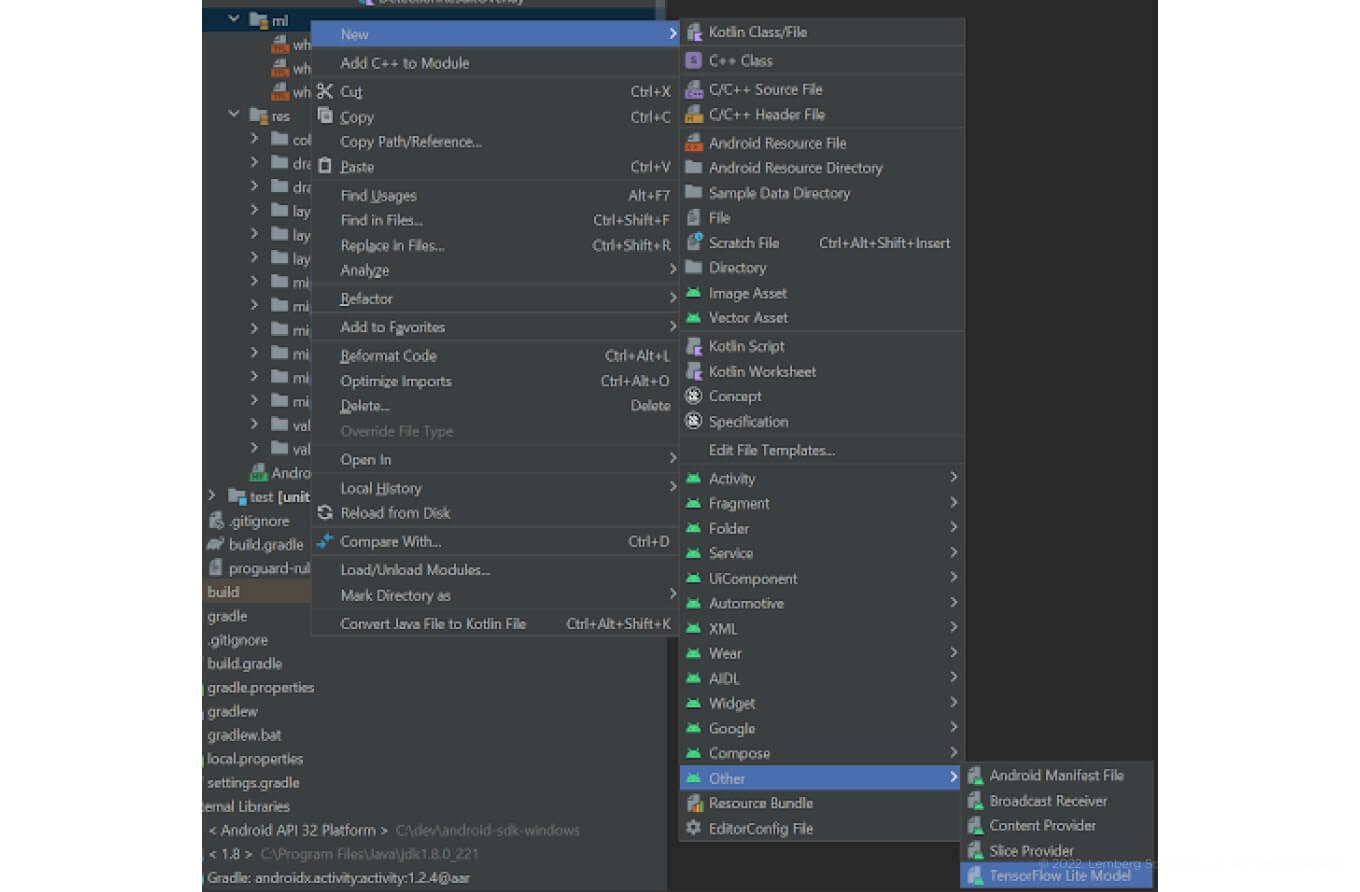
Then select our resulting model_with_metadata.tflite file.
During the import, the project build.gradle file will be adjusted to enable the mlModelBinding option:
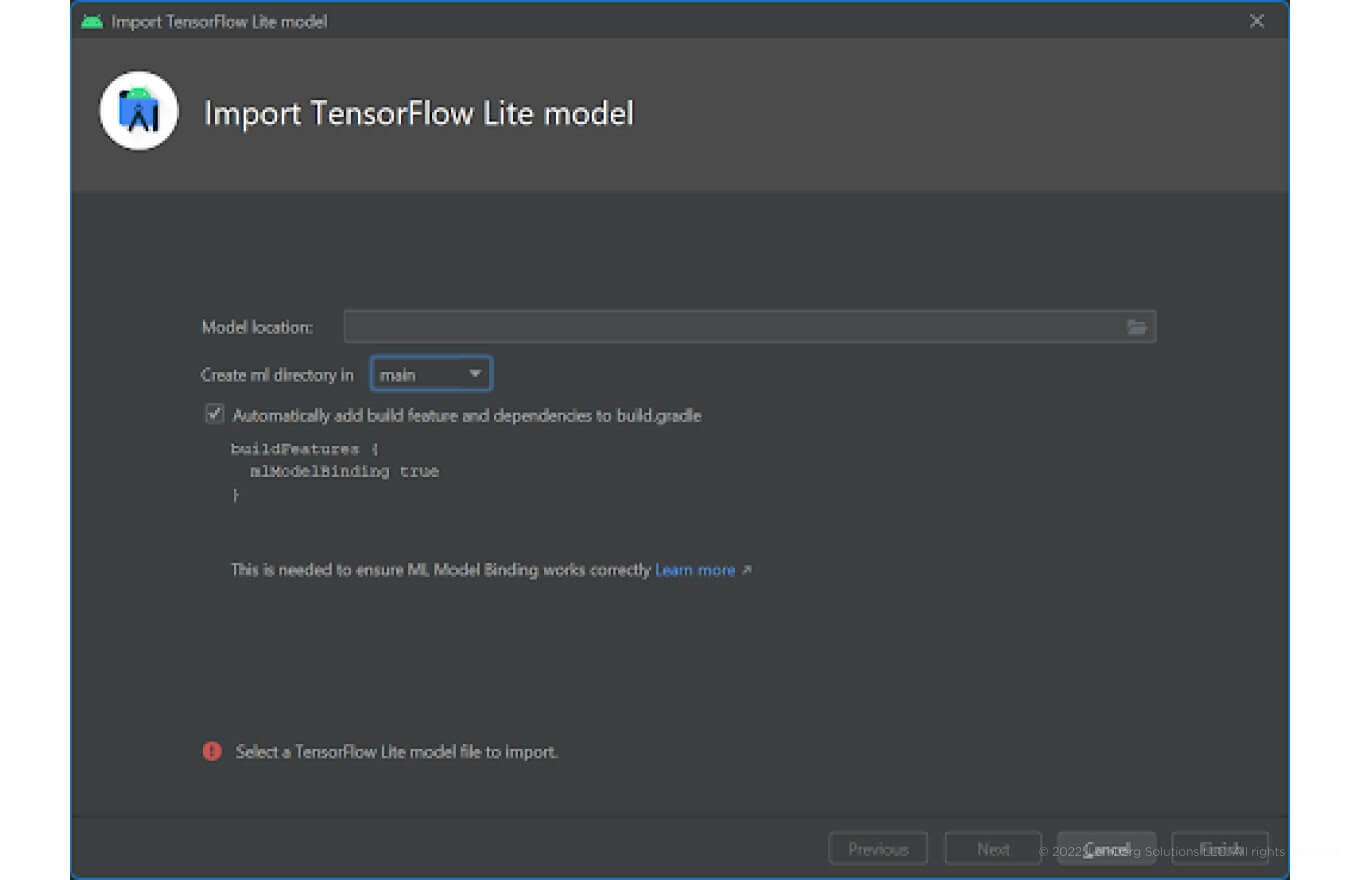
After importing, you will see the model details:
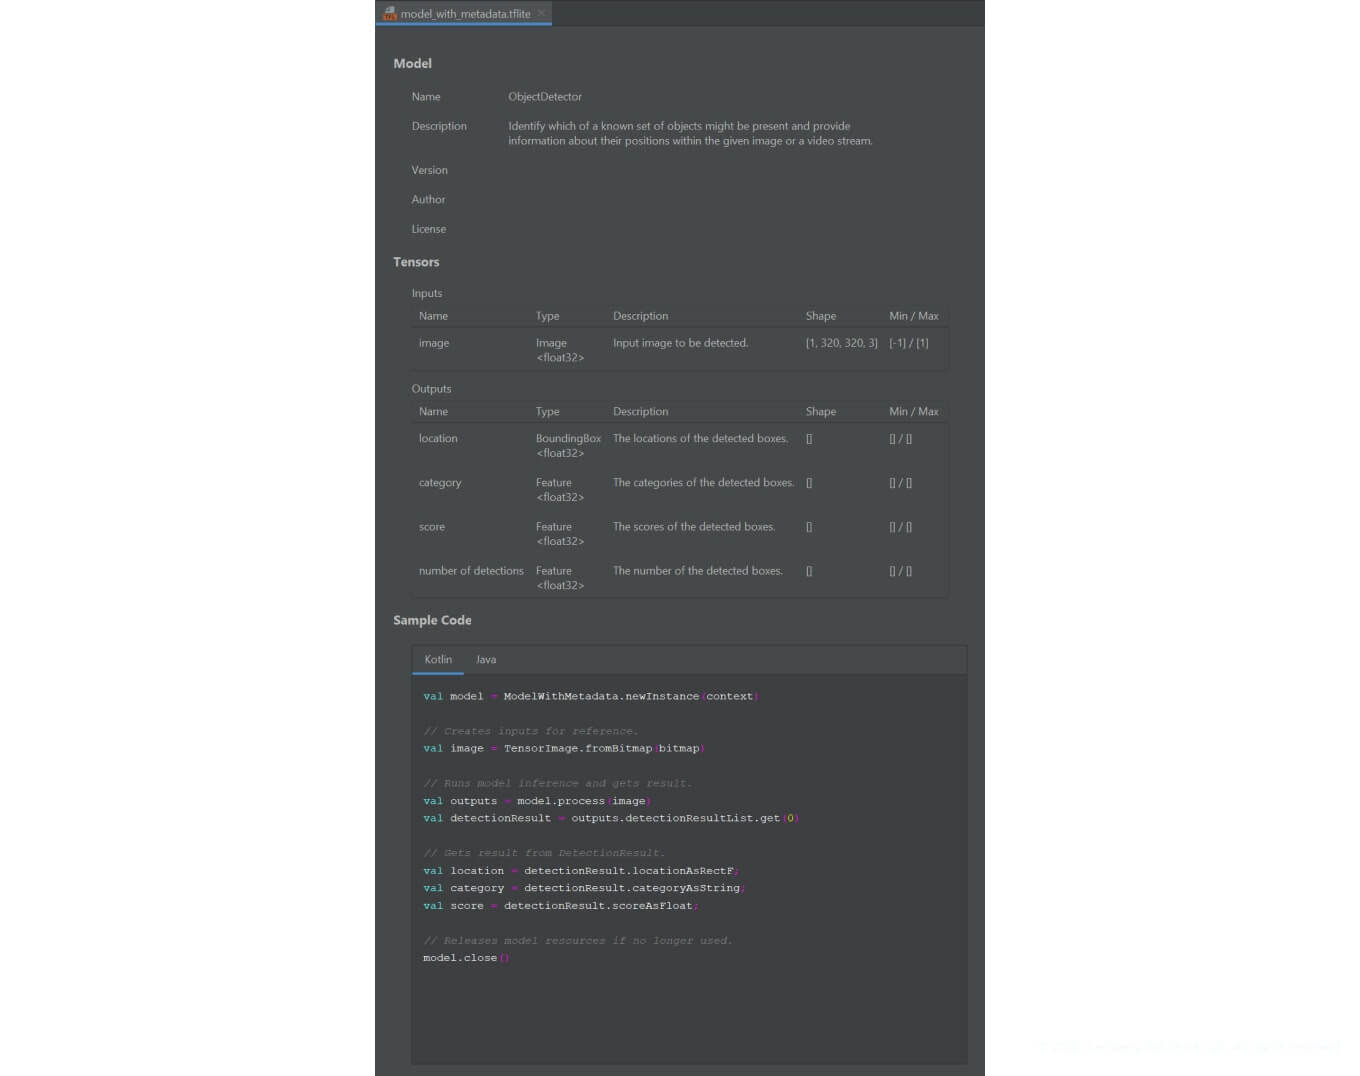
You’ll even get a code sample on how to use the model.
You may notice that the sample uses a class ModelWithMetadata that does not exist in the source codes. This class is generated during the application build and can be found at build/generated/ml_source_set/debug/your_package_name directory, like this:
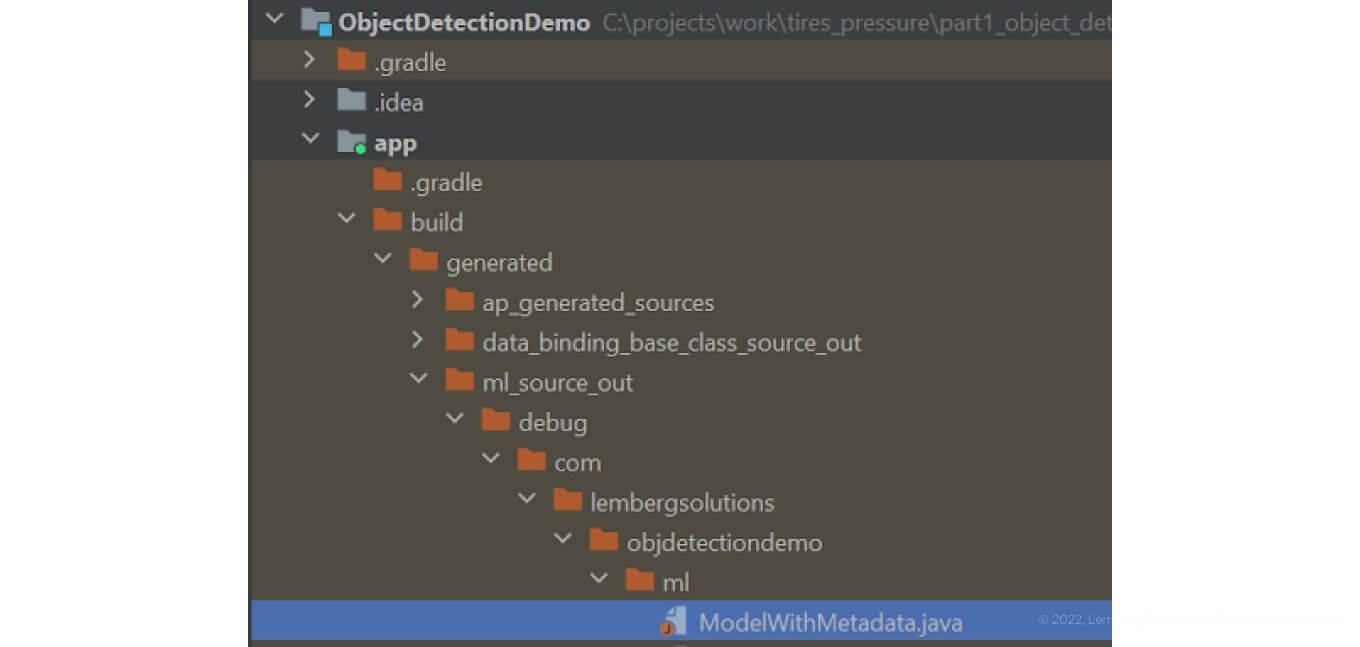
Let's review this class internals, including a constructor (code converted into Kotlin):
init {
        model = Model.createModel(context, "model_with_metadata.tflite", options)
        val extractor = MetadataExtractor(model.data)
        val imageProcessorBuilder = ImageProcessor.Builder()
            .add(ResizeOp(320, 320, ResizeMethod.NEAREST_NEIGHBOR))
            .add(NormalizeOp(floatArrayOf(127.5f), floatArrayOf(127.5f)))
            .add(QuantizeOp(0f, 0.0f))
            .add(CastOp(DataType.FLOAT32))
        imageProcessor = imageProcessorBuilder.build()
        val locationPostProcessorBuilder = TensorProcessor.Builder()
            .add(DequantizeOp(0f, 0.0.toFloat()))
            .add(NormalizeOp(floatArrayOf(0.0f), floatArrayOf(1.0f)))
        locationPostProcessor = locationPostProcessorBuilder.build()
        val categoryPostProcessorBuilder = TensorProcessor.Builder()
            .add(DequantizeOp(0f, 0.0.toFloat()))
            .add(NormalizeOp(floatArrayOf(0.0f), floatArrayOf(1.0f)))
        categoryPostProcessor = categoryPostProcessorBuilder.build()
        tfliteLabelsMap = FileUtil.loadLabels(extractor.getAssociatedFile("tflite_labels_map.txt"))
        val scorePostProcessorBuilder = TensorProcessor.Builder()
            .add(DequantizeOp(0f, 0.0.toFloat()))
            .add(NormalizeOp(floatArrayOf(0.0f), floatArrayOf(1.0f)))
        scorePostProcessor = scorePostProcessorBuilder.build()
        val numberOfDetectionsPostProcessorBuilder = TensorProcessor.Builder()
            .add(DequantizeOp(0f, 0.0.toFloat()))
            .add(NormalizeOp(floatArrayOf(0.0f), floatArrayOf(1.0f)))
        numberOfDetectionsPostProcessor = numberOfDetectionsPostProcessorBuilder.build()
    }
The model gets loaded from the resource, and a set of preprocessing and postprocessing operations are set up. The model metadata, like configuration of inputs and outputs, is used for these operations.
The provided sample uses a bitmap as an input and produces locationAsRectF, categoryAsString, and scoreAsFloat variables. In a real application, it would be useful to enumerate all “detection results” and get a list of location/category/score values.
locationAsRectF is of type RectF and denotes the coordinates of a detected object in pixels according to the input image size; categoryAsString is a String denoting the detected class;
scoreAsFloat is a Float value between 0.0 and 1.0, meaning the confidence level of a detection, where 1.0 is 100%
ObjectDetector
Another way to integrate the model is to use the ObjectDetector class from the TensorFlow Lite Task library. Add this library and other TensorFlow related libraries to your project dependencies:
    implementation 'org.tensorflow:tensorflow-lite:2.8.0'
    implementation 'org.tensorflow:tensorflow-lite-gpu:2.8.0'
    implementation 'org.tensorflow:tensorflow-lite-support:0.3.1'
    implementation 'org.tensorflow:tensorflow-lite-metadata:0.3.1'
    implementation 'org.tensorflow:tensorflow-lite-task-vision:0.3.1'
    implementation 'org.tensorflow:tensorflow-lite-gpu-delegate-plugin:0.3.1'
Use the following code to load the model:
val objectDetector = ObjectDetector.createFromFileAndOptions(
        context,
        “model_with_metadata.tflite.tflite”,
        ObjectDetector.ObjectDetectorOptions.builder()
            .setMaxResults(1)
            .setScoreThreshold(minimumConfidence)
            .setBaseOptions(buildBaseOptions(hwType, threads))
            .build()
    )
and run the detection:
val image = TensorImage.fromBitmap(bitmap)
val results = objectDetector.detect(image)
where bitmap is the input bitmap and result is a list of Detection objects where you get a bounding box and a category.
We’ve discussed how to integrate the TensorFlow Lite model into your Android application. But there is one important thing to check — the performance of the model, i.e., how much time is needed to process a single frame captured from the video. Just a reminder: this article is about running object detection in real time, meaning the processing time of a single frame should not exceed frame duration. For a 30 FPS video capture, that time is 1s/30 = 33ms.
Check this out:
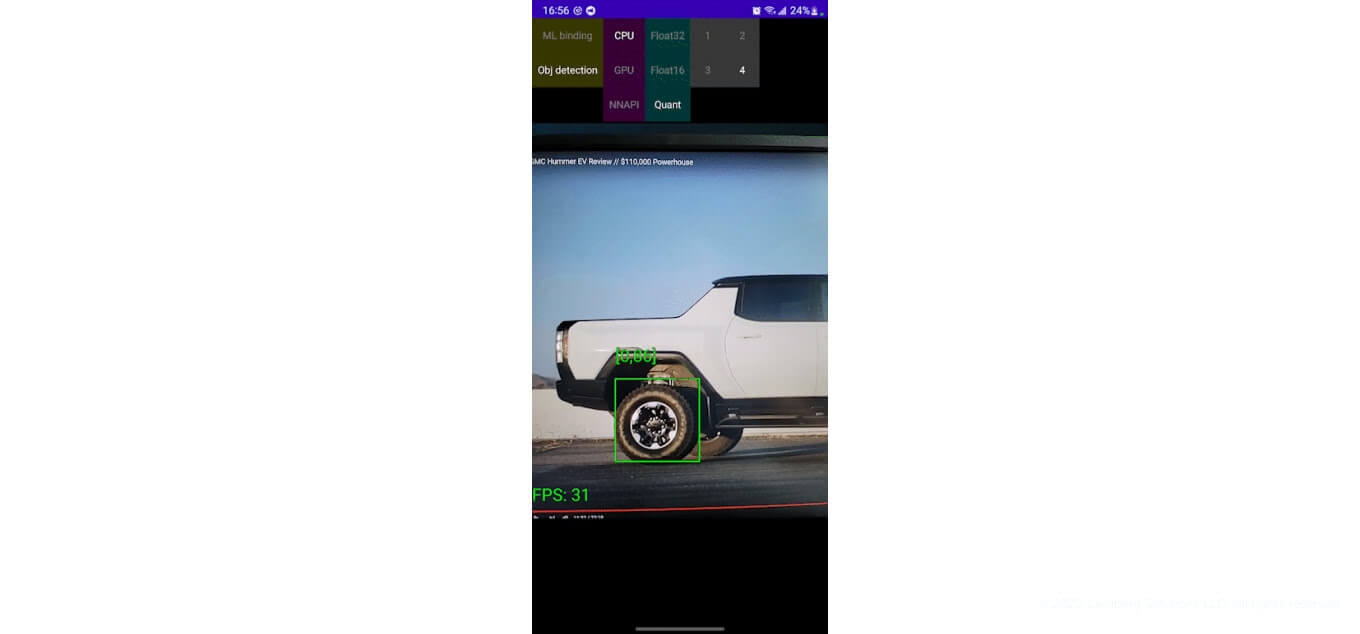
My Samsung Note 20 Ultra shows 30 FPS, so I would say that our goal is achieved.
TensorFlow Lite models can get some performance boost by running the model on different hardware: CPU, GPU, or NNPU (the latter is a dedicated neural processing unit).
Another option to increase performance is to use more than one processing core if possible.
The implementation of all these configurations can be found in demo application source codes.

Takeaway
Using the code snippets and tips I covered in this article, you can embed a computer vision system into your Android app. Here are all the steps for building a custom “object detector”, based on our experience in mobile app development services:
- A dataset preparation
- Training environment setup
- Model training and converting it into TensorFlow Lite format
- Integrating the model into our Android application
- Running the object detection on an Android device in real-time
In an upcoming article we will solve one more ML task and enhance our demo. Stay tuned!
In the meantime, if you are looking for an embedded development services partner who can develop an app with an embedded AI system, look no further. We at Lemberg Solutions are ready to take on this and plenty of other engineering tasks. So fill in our contact form and let’s get your challenge solved.

