
Introduction
There are many different ways to interact with smartphones these days: touchscreen, hardware buttons, fingerprint sensor, video camera (e.g., face recognition), D-PAD, handset controls, and so on. But how about using motion gestures?
For example, a quick move of the phone to the right or left while holding it in the hand can very precisely indicate the intention to switch to the next or previous song on a playlist. Or you might quickly flip the phone down and then up to refresh the application content. Introducing such interaction looks very promising and adds a new dimension to the UX, literally. This article will describe how to achieve this goal using machine learning and the Tensorflow library on Android.
Description
Let's clarify our goal. We would like for the phone to be able to recognize quick motions to the left and right.

We would like the implementation to reside in a separate Android library so that it can be easily integrated into any other application.
The motions can be captured with a gesture sensor in mobile, e.g. accelerometer, gyroscope, magnetometer, etc. Later, the batch of these motions can be used in machine learning algorithms for training and subsequent recognition.
To capture the data, an Android application will be developed. Preprocessing and training will be performed on a PC in a Jupyter Notebook environment using Python and the TensorFlow library. Gesture recognition will be implemented in a demo Android application with resulting training data. Finally, we will develop a ready-to-use Android library for gesture recognition that can be easily integrated into other applications.
Here is the high-level plan for implementation:
- Collect data on the phone
- Design and train the neural network
- Export the neural network to the phone
- Develop a test Android application
- Develop the Android library
Check also our article on How to Collect Data for Machine Learning Algorithm.
Implementation
Data preparation
First, let’s clarify what sensor and what kind of data can describe our motion gestures. Looks like, to precisely describe these gestures, both accelerometer and gyroscope should be used.
The accelerometer sensor obviously measures acceleration and, subsequently, movement:
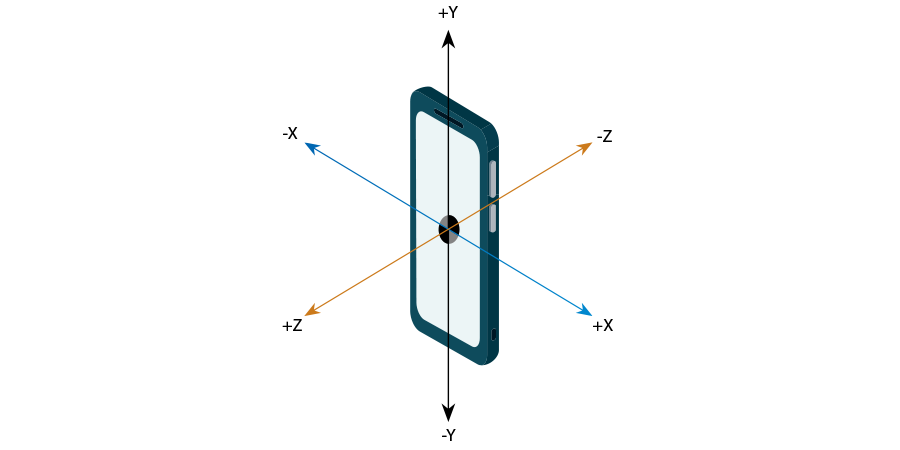
The accelerometer has an interesting nuance; it measures not only the acceleration of the device itself but also the gravity of the Earth, which is roughly 9.8 m/s2. This means that the magnitude of the acceleration vector of the phone laying on the table will be equal to 9.8. Such values can’t be used directly and should be extracted from the Earth gravity value. This is not so easy a task, because it requires fusion of magnetometer and accelerometer sensors values. Hopefully, Android already has special Linear Accelerometer sensor that performs such calculations and returns corrected values.
The gyroscope, on the other hand, measures rotation:
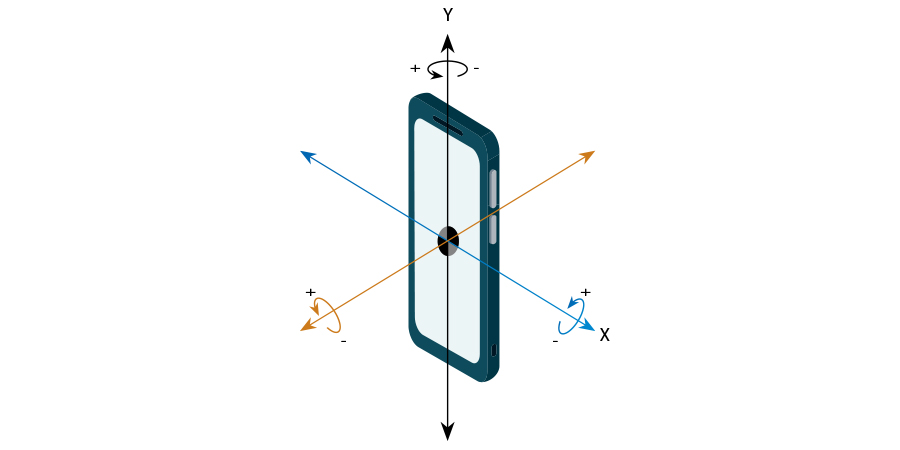
Let's try to identify what values will correlate with our motion gestures on Android. Obviously, in the accelerometer (meaning the linear accelerometer), X and Y values will highly describe the gestures. The accelerometer's Z value is unlikely to be affected by our gestures.
As for the gyroscope sensor, it seems that only the Z axis is slightly affected by the gestures. However, to simplify implementation, we propose not including that value. In this case, our gesture detector will recognize moving the phone not only in the hand but also along a horizontal, on the table, for example. This is presumably not too big a problem.
So, we need to develop an Android application that is able to record accelerometer data.
We developed such an application. Here is a screenshot of the recorded “move right” gesture:
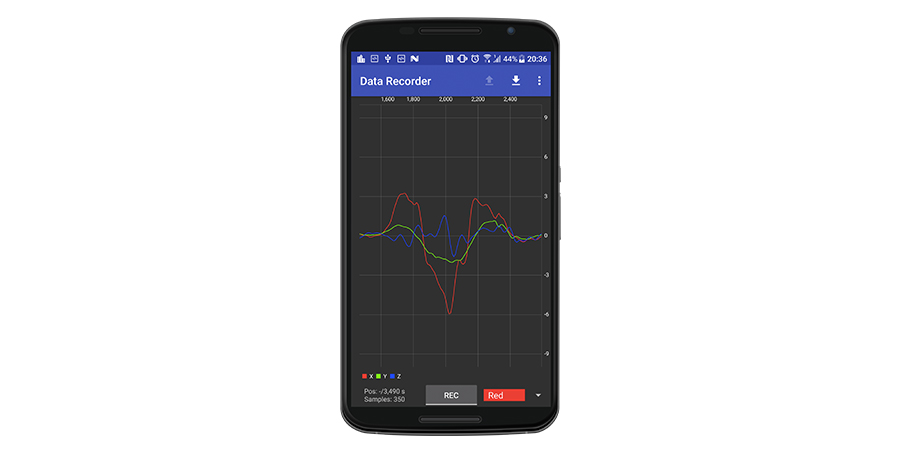
As you see, X and Y axes react very heavily to the gesture. The Z axis also reacts, but, as we stated, it will be not included in processing.
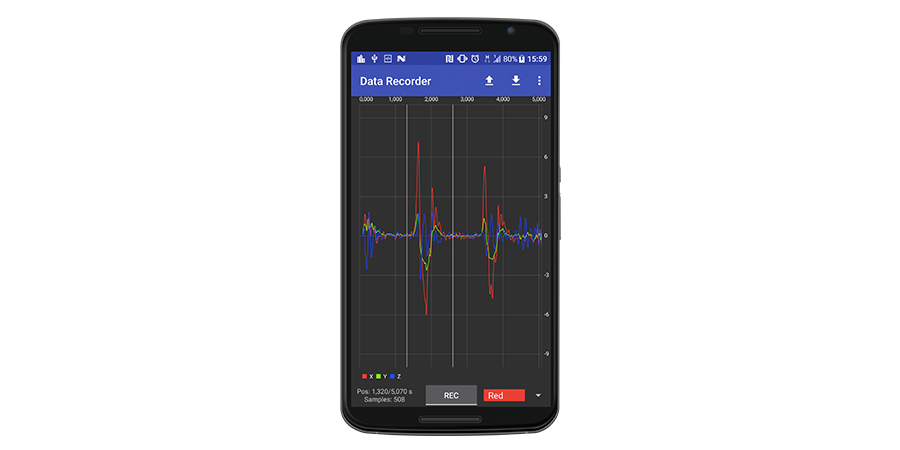
Here is the “move left” gesture:

Note that the X values are almost opposite to the values from the previous gesture.
One more thing that should be mentioned is the data sampling rate. This reflects how often the data are sampled and directly influences the amount of data per time interval.
Another thing to consider is gesture duration. This value, like many others here, should be chosen empirically. We established that gesture duration is not longer than 1 second, but, to make things run smoother, we rounded it up to 1.28 seconds.
The data sampling rate we selected is 128 points per selected duration, which gives a 10-millisecond delay (1.28/128). This values should be passed into the registerListener method.
The idea, then, is to train a neural network to recognize such signals within a real-time data stream from accelerometer sensors.
So, next, we need to record a bunch of gestures and export to files. Of course, the same type of gestures (right or left) should be labeled with the same labels. It is difficult to say in advance how many samples are needed to train the network, but this can be determined by training results.
By clicking on the data, the sample duration will be automatically highlighted:
Now, the “save” button becomes enabled. Clicking it will automatically save the selection to the file in the working directory. The filename is generated in the form “{label}_{timestamp}.log.” The working directory can be selected using the application menu.
Also note that, after saving the current selection, the next gesture will be selected automatically. The next gesture is selected using a very simple algorithm: find the first X entry whose absolute value is greater than 3, then rewind backward 20 samples.
Such automation allows us to quickly save a bunch of samples. We recorded 500 samples per gesture. Saved data should be copied to a PC for further processing. (Processing and training directly on the phone looks promising, but TensorFlow for Android currently does not support training.)
In a screenshot provided earlier, the data range is roughly ±6. However, if you wave the phone more forcefully, it can reach ±10. It is better to normalize the data so the range will be ±1, which much better fits the neural network data format. So, we simply divided all data by a constant coefficient, that was 9 in our case.
The next step that can be performed before starting training is to filter the data to eliminate high-frequency oscillations. Such oscillations are not relevant to our gestures.
There are many ways to filter the data. One is to filter based on the moving average box. Here is a picture of how it works:

Note that X data maximum values are now half of the original. Since we will perform the same filtering of real-time data during recognition, this should be not a problem.
The final step to improve the training is data augmentation. This process expands the original dataset by performing some manipulations. In our case, we simply shifted the data to the left and right by several points:

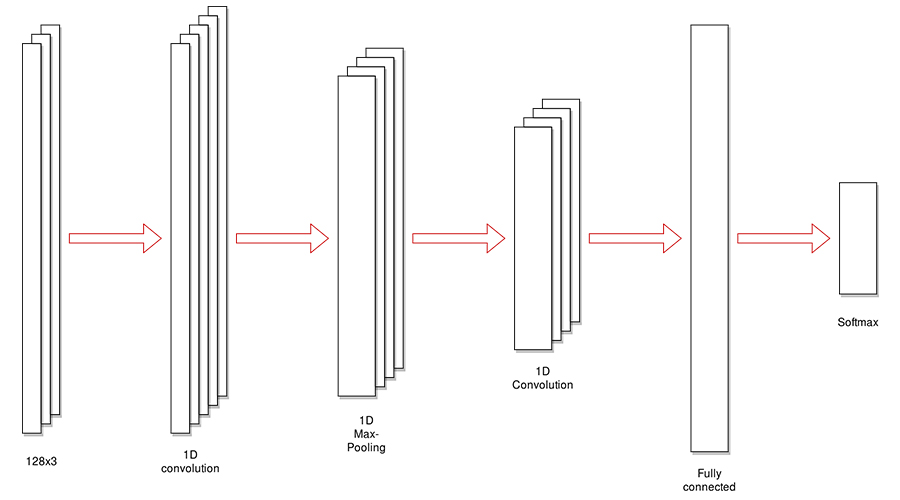
Designing a neural network
Designing a neural network is not a straightforward task and requires some experience and intuition. From the other side, neural networks are well known for some tasks, and you can simply adjust the existing network. Our task is very similar to the image classification task; the input can be treated as an image with a height of 1 pixel (and this is true -- the first operation is reshaping that converts input of two-dimensional data [128 columns x 2 channels] to three-dimensional data [1 rows x 128 columns x 2 channels]).
So, the neural network input is [128, 2].
The neural network output is a vector with the length equal to the number of labels. In our case, it is [2]. The data type is double precision floating point.
Here is a schematic of the neural network:
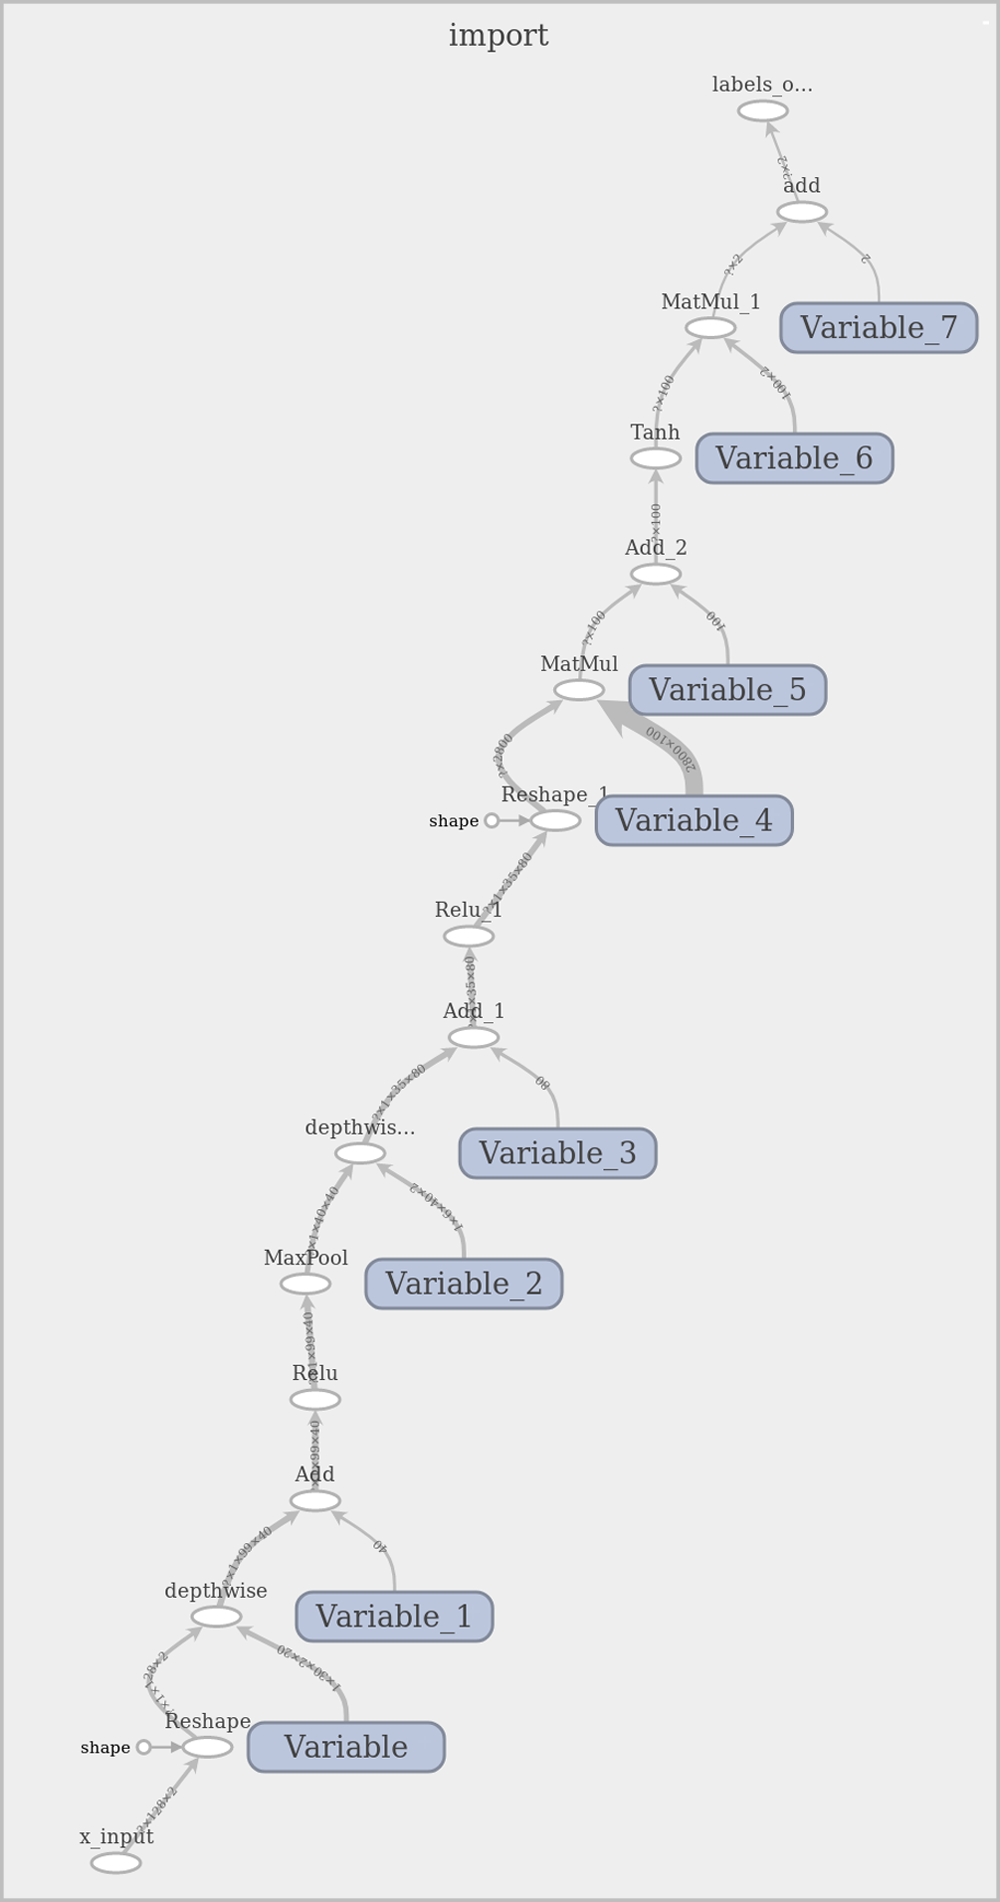
And here is a detailed schematic obtained through TensorBoard:

This schematic contains some auxiliary nodes needed only for training. Later, we will provide a clean, optimized picture.
Training
Training will be performed on a PC in a Jupyter Notebook environment using Python and the TensorFlow library. Notebook can be launched in the Conda environment using the following configuration file. Here are some training hyperparameters:
Optimizer: Adam
Number of training epochs: 3
Learning rate: 0.0001
The dataset is splitted into the training and validation set as 7/3.
The training quality can be controlled by training and testing accuracy values. Training accuracy should approach but not reach 1. Too low a value will indicate poor and inaccurate recognition, and too high a value will lead to overfitting the model and may introduce some artifacts during recognition like non-zero recognition evaluation for non-gesture data. Good testing accuracy is a proof that a trained model can recognize unseen earlier data.
Training log:
Show code
('Epoch: ', 0, ' Training Loss: ', 0.054878365, ' Training Accuracy: ', 0.99829739)
('Epoch: ', 1, ' Training Loss: ', 0.0045060506, ' Training Accuracy: ', 0.99971622)
('Epoch: ', 2, ' Training Loss: ', 0.00088313385, ' Training Accuracy: ', 0.99981081)
('Testing Accuracy:', 0.99954832)
TensorFlow graph and associated data are saved into files using the following methods:
Show code
saver = tf.train.Saver()
with tf.Session() as session:
    session.run(tf.global_variables_initializer())
    # save the graph
    tf.train.write_graph(session.graph_def, '.', 'session.pb', False)

    for epoch in range(training_epochs):
               # train

    saver.save(session, './session.ckpt')
Complete notebook code can be found here.
Exporting neural network
How to save TensorFlow data was shown in a previous section. The graph is saved into a “session.pb” file, and training data (weights, biases, etc.) are saved into a batch of “session.ckpt” files. These files can be large enough:
Show code
session.ckpt.data-00000-of-00001                 3385232
session.ckpt.index                                 895
session.ckpt.meta                                65920
session.pb                                       47732
The graph and training data can be frozen and converted into a single file suitable for running on a mobile.
To freeze it, copy the tensorflow/python/tools/freeze_graph.py file into your notebook directory, and run the following command:
Show code
python freeze_graph.py --input_graph=session.pb \
                --input_binary=True \
                --input_checkpoint=session.ckpt \
                --output_graph=frozen.pb \
                --output_node_names=labels_output
where output_graph specifies the output file and output_node_names specify the output node name. This value was originated in the Python code.
The resulting file is smaller than previous ones but still large enough:
Show code
frozen.pb 1130835
Here is this model in TensorBoard:
To get this image, copy the tensorflow/python/tools/import_pb_to_tensorboard.py file into notebook directory and launch:
Show code
python import_pb_to_tensorboard.py --model_dir=frozen.pb --log_dir=tmp
where frozen.pb is a model file.
Now, start TensorBoard:
Show code
tensorboard --logdir=tmp
There are several ways to optimize the model for a mobile environment. To run described commands, you will need to compile TensorFlow from sources:
1. Removing unused nodes and general optimization. Execute:
Show code
bazel build tensorflow/tools/graph_transforms:transform_graph
bazel-bin/tensorflow/tools/graph_transforms/transform_graph --in_graph=mydata/frozen.pb --out_graph=mydata/frozen_optimized.pb --inputs='x_input' --outputs='labels_output' --transforms='strip_unused_nodes(type=float, shape="128,2") remove_nodes(op=Identity, op=CheckNumerics) round_weights(num_steps=256) fold_constants(ignore_errors=true) fold_batch_norms fold_old_batch_norms'
Here is the TensorBoard result:

2. Perform quantization (convert floating point data format info 8 bit data format). Execute:
Show code
bazel-bin/tensorflow/tools/graph_transforms/transform_graph --in_graph=mydata/frozen_optimized.pb --out_graph=mydata/frozen_optimized_quant.pb --inputs='x_input' --outputs='labels_output' --transforms='quantize_weights strip_unused_nodes'
As a result, the output file is 287129 bytes in size compared to the 3.5 Mb of the original files. This file can be used in TensorFlow for Android.
Demo Android application
To perform signal recognition in Android application you need to use TensorFlow library for Android. Add the library to gradle dependencies:
Show code
dependencies {
    implementation 'org.tensorflow:tensorflow-android:1.4.0'
}
Now, you can access the TensorFlow API through the TensorFlowInferenceInterface class. First, put the “frozen_optimized_quant.pb” file into the “assets” directory of your application (i.e., “app/src/main/assets”), and load it in the code (for example, on Activity start; however, as usual, it is better to perform any IO-related operations in background threads):
Show code
inferenceInterface = new TensorFlowInferenceInterface(getAssets(), “file:///android_asset/frozen_optimized_quant.pb”);
Note how the model file is specified.
Finally, look at how to perform the recognition:
Show code
float[] data = new float[128 * 2];
String[] labels = new String[]{"Right", "Left"};
float[] outputScores = new float[labels.length];

// populate data array with accelerometer data

inferenceInterface.feed("x_input", data, new long[] {1, 128, 2});
inferenceInterface.run(new String[]{“labels_output”});
inferenceInterface.fetch("labels_output", outputScores);
Data is an input for our “black box.” There should be a flat array of accelerometer X and Y measurements, i.e., the data format is [x1, y1, x2, y2, x3, y3, …, x128, y128].
On the output, we have two float values with the range 0...1 with the probability of the input data according to “Left” or “Right” gesture. Note that the sum of these values is 1. Thus, for example, if the input signal does not match either Left or Right gesture, then the output will be close to [0.5, 0.5]. For simplification, it is better to convert these values into absolute 0...1 values using simple math.
Also, don’t forget to perform data filtering and normalization before running the recognition.
Here is final testing screen of the Demo application:
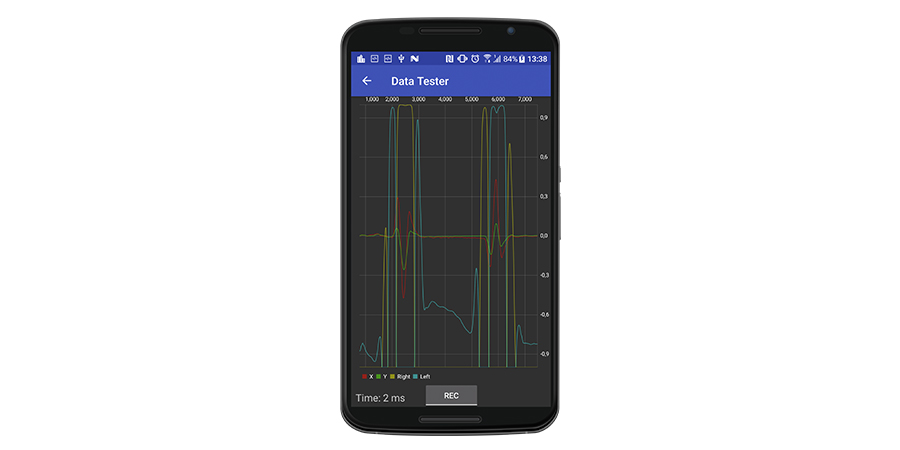
where “red” and “green” lines are a real-time preprocessed signal. Yellow and cyan lines belong to “fixed” “right” and “left” probabilities, respectively. “Time” is processing time, and it is pretty low, which makes it possible to perform recognition in real time. (Two milliseconds means that processing can be run at a 500 Hz rate while we requested the accelerometer to update at 100 Hz).
As you can see, there are some surprising nuances. First, there are some non-zero probabilities even for the “silent” signal. Second, every gesture has long “true” recognition at the center with the value close to 1.0 and small opposite recognition at the edges.
Looks like, to perform accurate actual gesture recognition, some additional processing is needed.
Android Library
We implemented TensorFlow recognition altogether with additional processing of the output signal in a separate Android library. Here is the library and demo application.
To use it in your own application, add library dependency to the module gradle file:
Show code
repositories { maven { url "https://dl.bintray.com/rii/maven/" } }
dependencies {
    ...
    implementation 'uk.co.lemberg:motiondetectionlib:1.0.0'
}
create a MotionDetector listener:
Show code
private final MotionDetector.Listener gestureListener = new MotionDetector.Listener() {
   @Override
   public void onGestureRecognized(MotionDetector.GestureType gestureType) {
     Log.d(TAG, "Gesture detected: " + gestureType);
   }
};
and enable motion detection:
Show code
MotionDetector motionDetector = new MotionDetector(context, gestureListener);
motionDetector.start();
Conclusion
We passed through all steps of implementing motion gesture recognition on an Android application using the TensorFlow library: capturing and preprocessing training data, designing and training a neural network, and developing a test application and ready-to-use Android library. The described approach can be used for any other recognition/classification tasks. The resulting library can be integrated into any other Android application to boost it with motion gestures.
Hope you have found this article useful, you can also watch video overview below.
If you have a project idea in mind but don't know where to start, we're always here to help you.

