Mobile apps play a significant role in retaining your target customers since an increasing number of users go mobile. According to Ipsos MORI mobile app research report, more than 90% of smartphone users regularly interact with applications. Indeed, they expect to find your company in the App Store or Google Play.

Companies win the competition by developing mobile applications that simplify customer interactions with brands.
For example, Domino’s Pizza created a mobile app that “remembers” the customer’s regular order details and allows ordering pizza in 10 seconds with no excessive actions from the client side. This strategy made the ordering process as easy as ever and helped the company gain customer loyalty.
Check cases from Lemberg Solutions experience:
- Startup app that uses machine learning for advanced horse training
- Mobile app for conference and event visitors
In this article, we would like to explore what the acceptance criteria of mobile app development companies are and how to choose a mobile app development company.
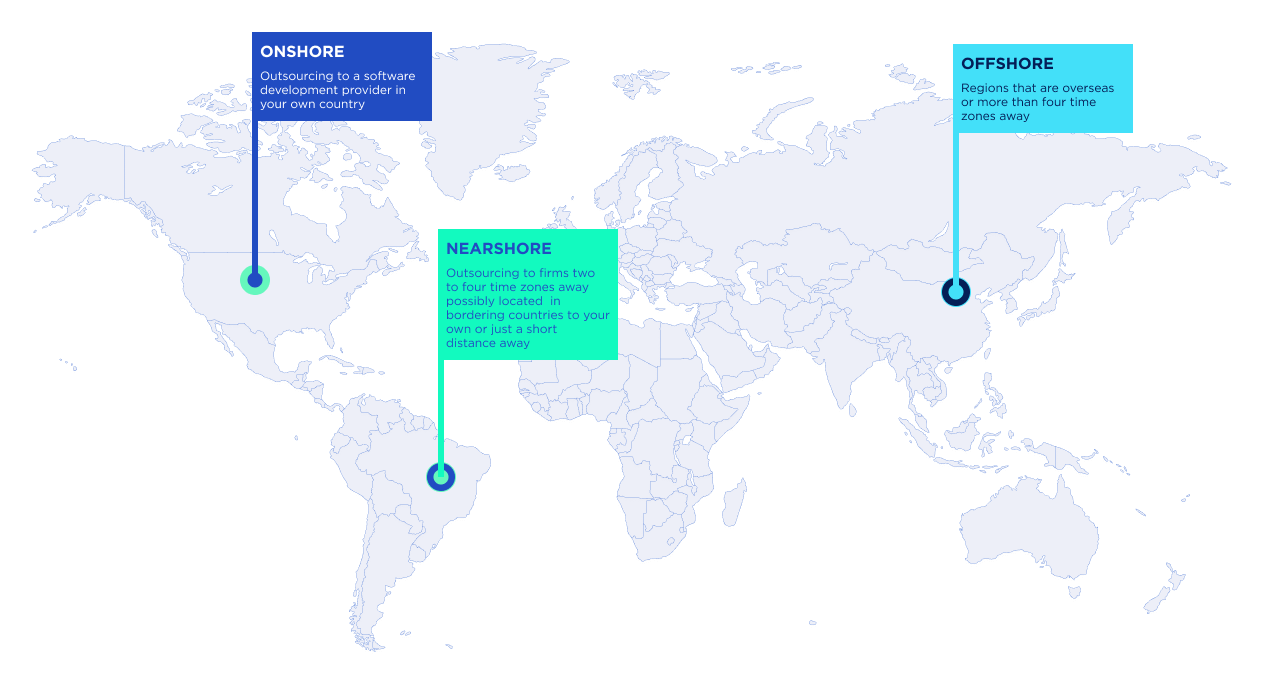
Mobile app developers' locations: onshore, nearshore, or offshore
The talent pool of mobile application development providers is significantly broad as you can find highly skilled teams in any county worldwide.
However, selecting the right partner and type of cooperation requires more comprehensive research. Hence, further, we will explore the differences between onshore, nearshore, and offshore, as well as some other essential factors to consider for the best choice.

Onshore mobile app development vendors
Software development providers based in your country might be more expensive, especially for the US and the UK. The higher hourly rates of the developers drive the software product prices higher as well. Sometimes companies select onshore developers to ensure more straightforward communication. However, that's not an issue when project management is fine-tuned.
Nearshore and offshore mobile app development companies
Hiring nearshore or offshore software development companies will surely save you money. According to The 2022 Guide to Global Software Outsourcing Rates by Accelerance, companies save 40% to 70% in development costs thanks to outsourcing. US and Western European app developers are more expensive than engineers from other countries.
That’s why many of the biggest names in the software industry, such as Microsoft, Intel, Apple, and eBay, outsource their projects to Eastern European companies. Some of the most attractive outsourcing destinations are Eastern European countries, Asia, and South America.
However, do not neglect the quality for the low price.
How to find an app development company: 5 steps
At first, this process requires setting up business goals, defining core features and the functionality of the mobile app, and also making critical technical decisions to ensure a smooth experience for the users. Hence, picking the right mobile application development company is pivotal and defines the success of your app idea.
We’ve outlined 5 of the most important steps that companies should take when choosing mobile app developers.
1. Define the company profile — whom are you looking for?
The selection of a mobile development partner entirely depends on your project requirements and specifications if these documents are already formed.
Your project defines how many engineers you should have in the development team, what technologies they must be proficient in, what domains and kinds of mobile applications they should have experience in, etc.
The more information you own, the easier your choice will be. Hence, if you only have an app idea that has come to your mind, and your project should start with the discovery phase, you should first decide on a convenient location.
The location of your potential app development partner is defined by several factors, particularly the project budget, the expected scope of work, and the tech stack. Thus, we recommend exploring mobile app development technologies to ensure your future development partner`s team is proficient in all of them to avoid any restraints on the project.
2. Create a list of 30 potential tech partners
As you outlined the approximate portrait of your ideal candidate, the next step is market research in order to find and compile the best matches to your current needs. Creating a long list is unnecessary to avoid getting confused or wrong.
You can find companies on the following dedicated web platforms:
- Clutch.io
- Businessofapps
- Crunchbase
- Goodfirms
These websites provide tools for filtering mobile development companies by location, hourly rate, expertise, and more. So you will get the desired company profile in no time.
At this point, we suggest picking 20-30 vendors who match your requirements and collecting them into a single list for further comparison due to their suitability to your ongoing needs.
3. Dive into their expertise
After that, we advise shortening the list to 5-10 companies to learn deeper about the companies and their app development expertise.
You must consider and explore their past mobile app development projects, including the development process, used technologies, and testimonials. That way, you can ensure their real market experience and service quality and see solutions delivered.
For example, if you want a mobile app to control a light bulb using the left and right smartphone moves or when you are about to create an app for navigation inside a vast shopping mall, you would need developers who have implemented iBeacons before.
In addition, you can request your project estimation, depending on the scope of the project information you have. This will also help you determine your ideal candidate in the short term.
4. Request for information
After the final selection, you should send an official request for proposal (RFP) and request for information (RFI) regarding your project. Make sure you explain your product idea in detail to find mobile app developers that suit your needs. You will save time for communication for both parties.
Request for information (RFI)
Request for information (RFI) is a business process for gathering and prospecting information. RFI is the de-facto standard to collect the required information from a service provider and compare it to other RFIs.
Request for proposal (RFP)
This term is an official document requiring a proposal based on specific criteria. It is applied to various commodities, valuable assets, and mainly services.
In our case, RFP is used when the request entails a software product that does not exist yet. Requests for proposals should include the project idea as well as clear long/short-term business goals. Make sure to provide as many details as possible. For example, extra information about acceptance criteria, ROI, BA, and marketing research will help you get better responses.
5. Choose the right one for your project
How to choose the best mobile app development company? As all information you need is collected, it should be analyzed by you, other stakeholders, and your team, who will directly work with the outsourcing development dev team.
Your mobile app development partner has to be on the same page with you and share your business needs and goals, providing all the required resources and capabilities to meet your project demands and build a highly functional product.
Considerations when choosing a mobile app development company
Here, we would like to cover more things you should consider before signing the contract with your mobile app development services partner not to make a wrong decision that will cost you time, money, and effort.
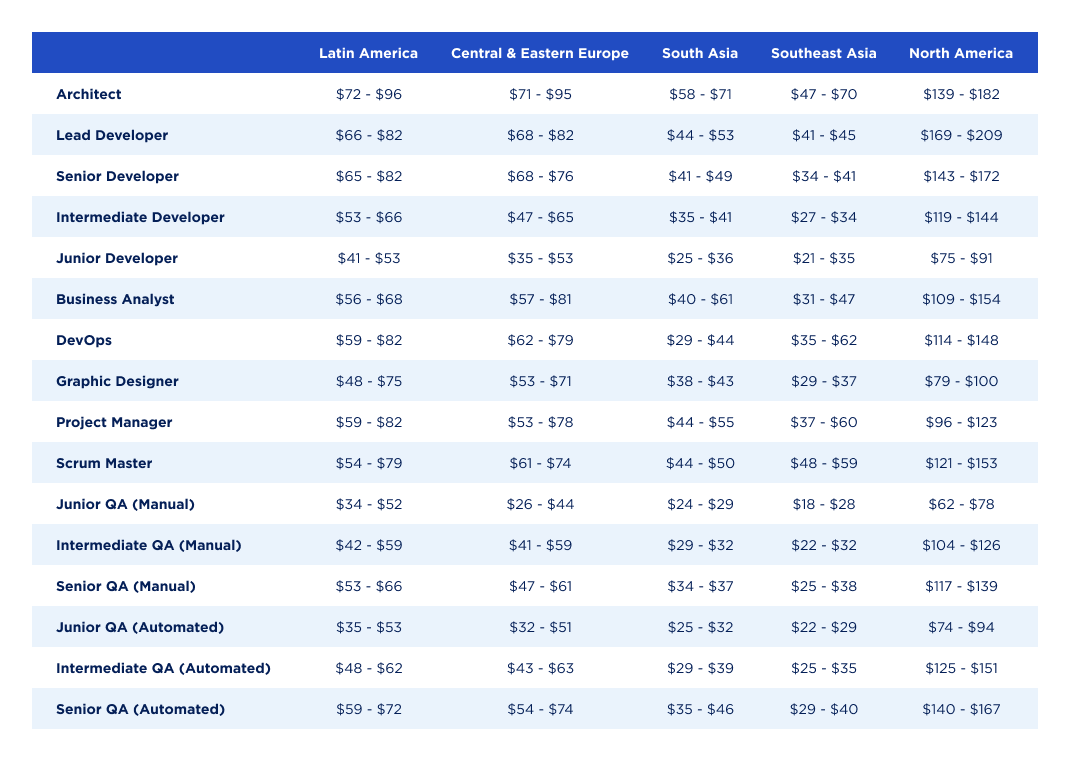
Hourly rates and their possible amendments
Many factors influence the project estimation and final price, among which are product requirements, changes in the work scope during the development, and hourly rates of the developers.
Below you can also get acquainted with the current hourly rates of the developers in different locations: nearshore, onshore and offshore.

If your project is in the development phase for 6+ months, you should be ready for the rates of the engaged developers to increase. You should communicate this risk with the team before you start the cooperation and find the solution.
For instance, some rates can be fixed depending on the duration and complexity of the project, or you should specify the extreme limits to raising the rates.
Look at the testimonials
Nothing will tell you about your potential development partner more than testimonials from past clients. There are two ways you can go - look at the testimonials on their business website or find their company account on Clutch or other similar rating-based resources.
Project size matters
Mobile app development companies range from development giants to small dedicated teams. The first ones usually work on enterprise projects, have several development centers with 1000+ employees worldwide and offer full-stack service, including business consulting. Choosing such a company for developing your mobile application is the right choice when you plan a large-scale project since the considered project budget might start at $500,000.
We recommend opting for small to medium-sized mobile development companies for smaller projects. They might be more flexible, affordable, and more likely to work with startups when offering the same expertise.
Now it is the time to decide
Once you’ve received all of the proposals, it’s high time to compare them to how to find an app developer. There are five significant points you should look for:
- The scope of work
- Process planning
- The timeframe for the job
- Price estimations and quotes
- Support for the final product.
Do not underestimate the importance of the process planning over timeframe and pricing. The plan should be flawless, or your project risks delays and unexpected budget changes. The support of the final mobile application is also widely underestimated, but it’s equally important as the development itself.
To wrap it all
We hope that you’ve learned a lot and you are ready with your research, so let’s sum it up. We covered that the app experience is a significant portion of the mobile industry, and the trend is here to stay, with more and more businesses tapping into the opportunities of mobile apps.
We also went through the five necessary steps to find the right technology partner for your mobile application, and we explained in detail what’s important.
With our broad custom mobile application development services, we are here to help you grow your app idea into a functional product.

FAQs
What things to consider when looking for a mobile app development partner?
When researching the market to find a mobile app development vendor, you should pay attention to their duration on the market, technical and domain expertise, past project, and testimonials are essential.
Where to look for experienced mobile developers?
Whether you need a complete outsourcing team or extend your in-house engineering team, you will partner with the software house that will provide you with this or that service due to your ongoing requirements. Websites like Clutch, Goodfirms, Crunchbase, Linkedin, etc., will show you hundreds of development companies.
What are the current rates of mobile developers?
The hourly rates differ depending on the location of your future mobile app development partner, whether it is onshore, nearshore, or offshore.


